
 Feedback
Getting Started
Published Date: 09-07-2026
Read Time:
Below is the flowchart for Salesforce to Jira Integration.

Let's glance at all the major steps involved in Salesforce Jira. For more information on each individual section, use the navigation panel on the left.
Sinergify is a powerful connector for Salesforce and Jira integration, offering a broad range of integration possibilities.
Note: Our team offers assisted support for implementation assistance in case a customer needs it. Customizations can also be done in case a customer needs a tailored Sinergify instance.
Pre-Requisites
-
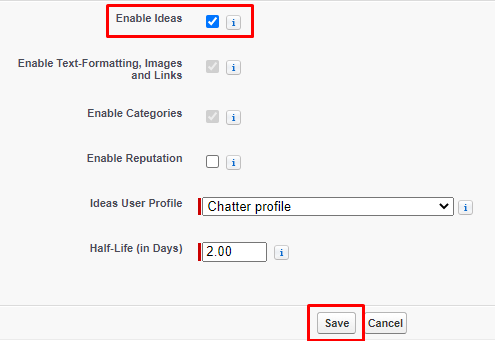
Enable Ideas
-
Login to the Salesforce instance.
-
Switch to Classic Experience and click on ‘Setup’.
-
In the Search box enter ‘Idea Settings’.
-
Select Edit, and then select Enable ‘Idea’. See the reference screenshot below.
-
Once done click ‘Save’.

-
Enable Incident Management
-
Go to setup and then search ‘Customer Service Incident Management’.
-
Enable the toggle Button.


Sinergify is compatible with Salesforce Incident Management, it is important to enable incident management upon installing the package. You can disable the setting once the package is installed.
-
Enable Email to Case
-
Go to setup and search ‘Email-to-Case’.
-
Select Email-to-Case from the search results under Service Setup.
-
A new screen will appear, click on the ‘Enable Email-to-Case’ checkbox.


-
Setup Integration user
The integration user is the Jira user who will be responsible for syncing, creating, and modifying the data from Salesforce to Jira. Hence, in order to attain the features available on the Jira Platform within Salesforce, it is necessary to have a unique or dedicated integration user. The authentication process on the Sinergify Admin page needs to be done via this integration user only. This user must have all the right permissions in order to make successful updates on Jira.
Please refer to the article below for reference.
https://kb.sinergify.com/Permissions/permissions-for-integration-user-on-jira02.htm
Similarly, for Jira to Salesforce sync, it is also recommended to use a unique or dedicated Salesforce user with an admin profile or a similar custom profile with the right object and CRUD permissions as per your use case.
Salesforce Installation
-
Log into your Salesforce instance.
-
Go to the App launcher (9 dots).
-
Click on the ‘View all’.
-
Search ‘Sinergify’ and click ‘Get in now’.
-
The application can take some time to install. Users are notified via email once the application is installed in the system.
|
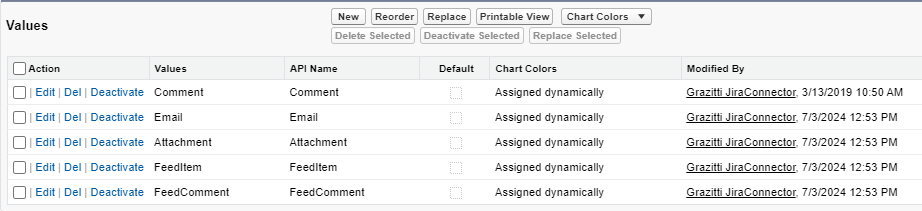
Note: Post the installation please verify the below-mentioned values in the CaseJiraHelper object. Steps to check the values: 1) Go to the Object manager. 2) Search for CaseJiraHelper object from the list. 3) Go to Fields and Relationships>Grz_Sf__Type__c 4) Open the field and look for the values.
5) If the values are not created then click on New and add the values with the below names.
|

Setting up Sinergify on Salesforce
-
-
Enter Jira Credentials and choose Default Instance.
-
Choose the type of Jira Instance (Server/Cloud)and Enable status active.
-
-
-
Open the Jira instance and create application links.
-
Once the application links are created, add the Salesforce org URL and click on the Edit button. Enter the consumer name and consumer key details.
-
Select incoming authentication, and then enter the public key and callback URL. Once done, click ‘Save’ and check if the status is ‘Configured’.
-
Log in to Salesforce org and open the Sinergify admin settings then click on OAuth Authentication.
-
Enter the values and make sure to check the default status ‘Active’.
-
-
Sinergify Configuration Settings: The configuration settings for both Salesforce and Jira instances can be done from the Admin Settings section.
-
Project Mapping: Manage Jira projects and their permissions from Salesforce.
-
Field Mapping: Build the Jira detail page in Salesforce and manage what fields need to be made visible in Salesforce.
Setting up Sinergify on Jira
With Sinergify introducing the Jira side Plugin, you can now easily configure and showcase Salesforce field details on Jira.
Jira Cloud Plugin
Jira Server/Data Center Plugin
-
Setting up the Jira Plugin(Cloud/Data Center)
-
Create a Salesforce Connected App, which is required before installing the application in Jira.
-
-
Installation
-
Select Apps, and under the drop-down menu, select Find new apps in your Jira instance.
-
Enter Sinergify in the Search for Apps input box and press enter.
-
Select ‘Sinergify’ and select ‘Get App’ to install the application in the background.
-
-
Authentication
-
Select Manage Apps from the Apps drop-down and Authentication from the left panel.
-
Please enter the Salesforce login URL and keys for the Connected app. Verify whether the app is connected or not.
-
-
Event Configuration
-
Configure settings for Jira issue-related events.
-
-
Configuration and Field Mapping:
-
Configure settings for the Panel on the Issue screen and Fields Configuration for Search and Panel views.
-


