Feedback
OAuth 2.0 Authentication
Published Date: 14-07-2026
Read Time:
Objective: Configuration of OAuth 2.0 authentication between Salesforce and Jira (Cloud, Server/Data Center).
-
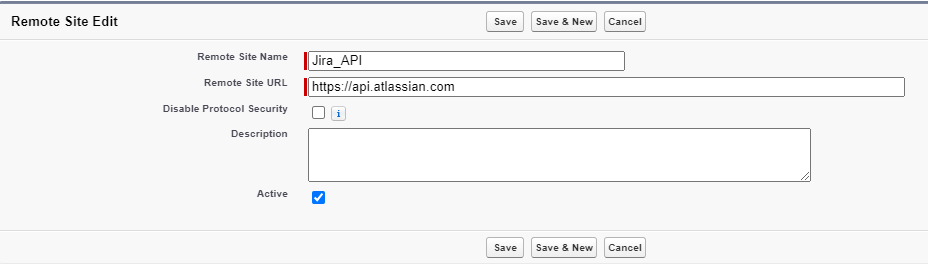
Prerequisites: Configure Remote Site Settings
Before configuring authentication, you must define the following Remote Sites in Salesforce to allow secure communication.
-
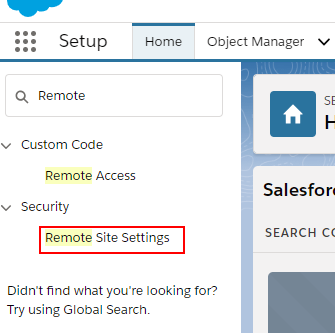
Navigate to Setup in Salesforce.
-
In the Quick Find box, search for Remote Site Settings.
-
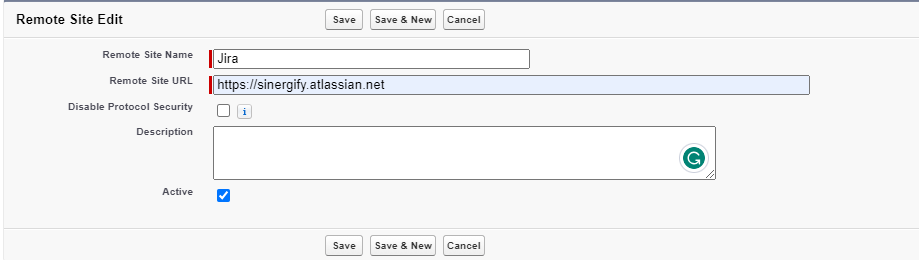
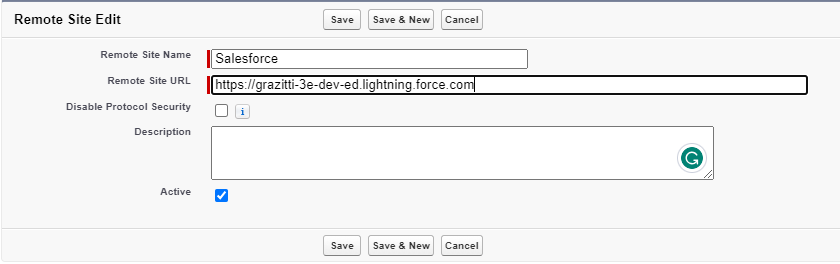
Click New Remote Site and create the following entries:
| Remote Site Name | Remote Site URL | Applicable To |
|---|---|---|
|
Jira |
https://[Your-Jira-Instance-URL] |
Cloud and Data Center |
|
Salesforce |
https://[Your-Salesforce-Org-URL] |
Cloud and Data Center |
|
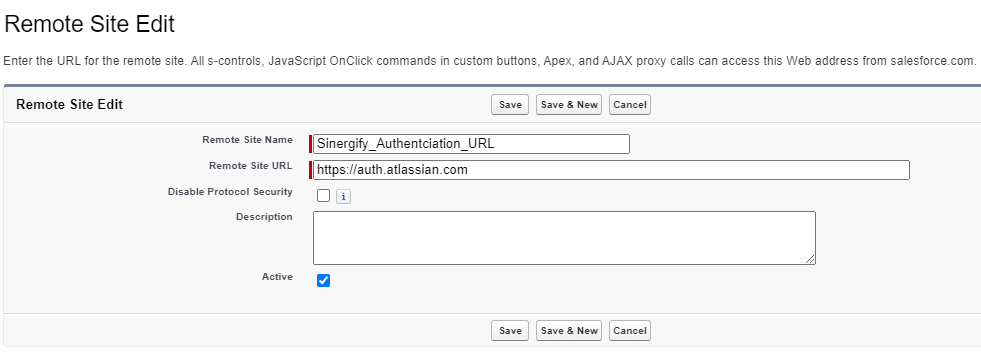
Authentication URL |
https://auth.atlassian.com |
Cloud only |
|
Jira API |
https://api.atlassian.com |
Cloud only |

Common Error: If any Remote Site Setting is missing or inactive, you will encounter the error: "Attempt to de-reference a null object. An unexpected error has occurred (Grz_Sf)." Ensure all entries are Active before proceeding.
-
OAuth 2.0 Authentication: Jira Cloud
This section applies to Jira Cloud instances hosted on atlassian.net. For Jira Server or Data Center, refer to Section 3.
Create and Configure the Jira App
-
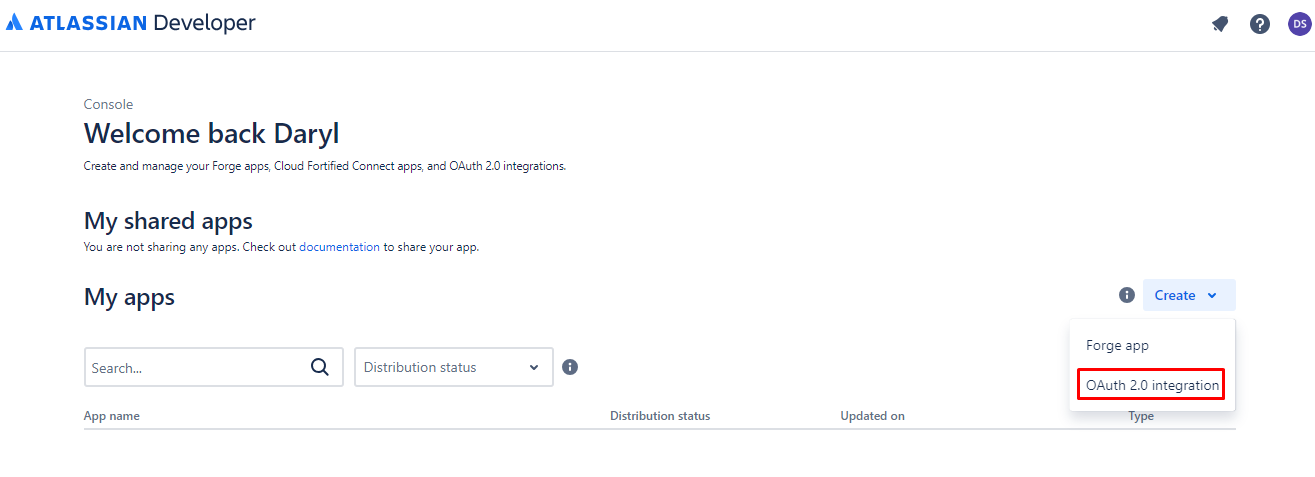
Navigate to the Jira Developer Console (developer.atlassian.com/console/myapps).
-
Click Create and select OAuth 2.0 Authentication.

-
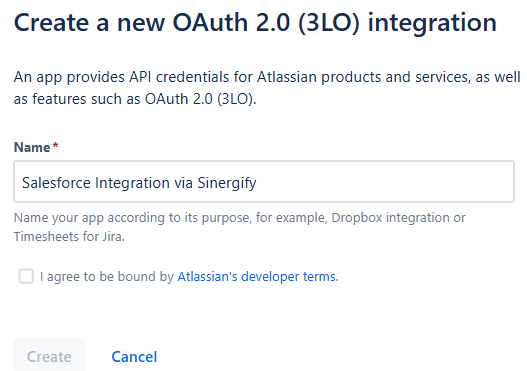
Name the app "Salesforce Integration via Sinergify", accept the developer terms, and click Create.

-
In the left navigation panel, select Permissions and configure the following API Scopes:
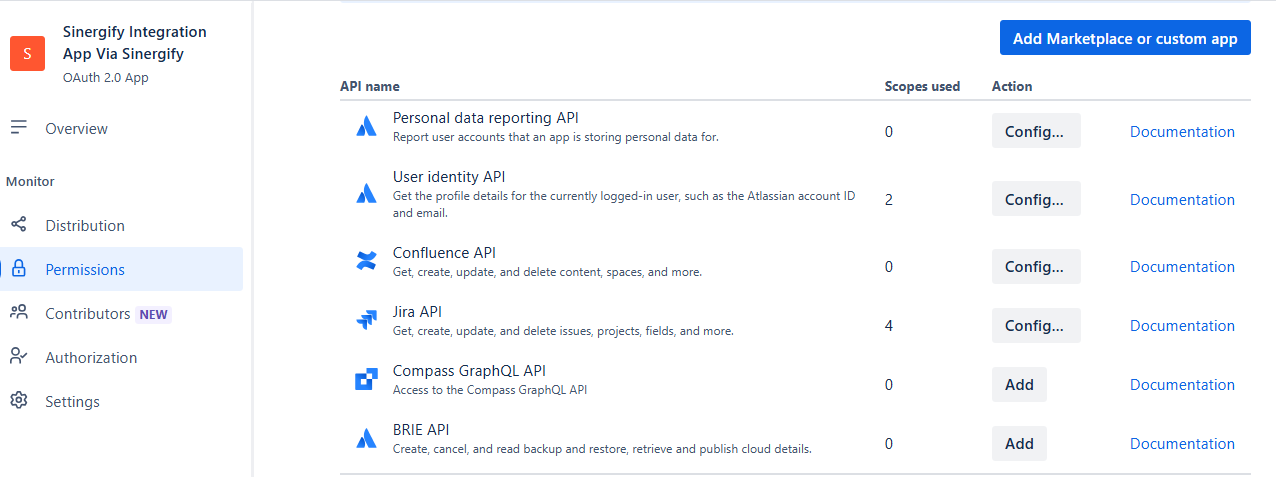
-
Add the following required scopes for the Jira API by clicking on Add and selecting them one by one. These scopes are necessary for the integration to function properly:

| Scope | Description |
|---|---|
|
read:jira-work |
View Jira issue data, attachments, and worklogs. |
|
read:jira-user |
View user profiles, email addresses, and avatars. |
|
write:jira-work |
Create/edit issues, post comments, and create worklogs. |
Note — Adding Additional Scopes:
-
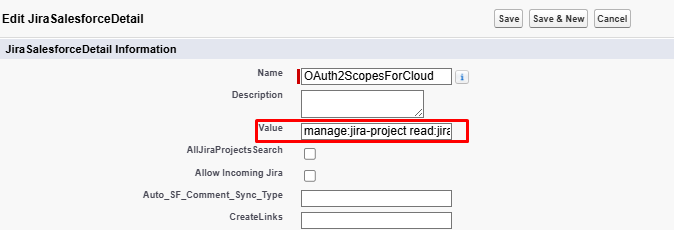
If additional scopes are required, add the scope on the Jira OAuth app first, then in Salesforce go to Setup > Custom Settings > JiraSalesforceDetail > Manage.
-
Open the existing record OAuth2ScopesForCloud and add the scope code in the Value field. Save the changes.
-
Ensure the scope code matches exactly on both sides. The record is already created — you only need to update the Value field.
-
To add multiple scopes, paste all scope codes in the Value field separated by a space (e.g., manage:jira-project read:jira). Do not use commas.
-
Navigate to Authorization in the left panel and click Add.

-
Enter the Consumer Callback URL using the following format:

Callback url format:
[SalesforceOrgURL]/apex/Grz_Sf__AuthPage?status=[SalesforceOrgID]&instanceUrl=[JiraInstanceUrl]
Example:
https://connectorjira-dev-ed.my.salesforce.com/apex/Grz_Sf__AuthPage?Status=00D0o000000Sx8ZEAS&instanceURL=
https://sinergify.atlassian.net
-
Click Save Changes.
-
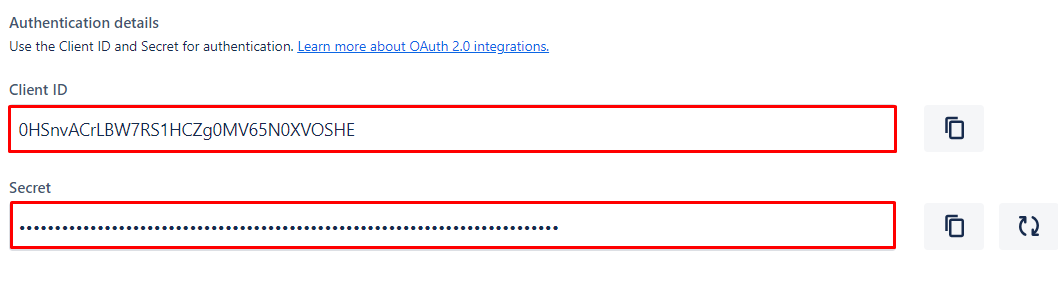
Navigate to Oauth App Settings > Authentication details and copy the Client ID and Client Secret.

Granting App Access When the App Owner is Different
Important: We recommend the OAuth 2.0 app is created directly by the Jira integration user (the account used for the Sinergify–Jira connection). If the app was created by a different user such as a Jira Admin, use one of the options below before proceeding.
Option A — Add the Integration User as a Contributor
Use this when the integration user only needs to authorize and use the app, without full ownership.
-
Go to the Atlassian Developer Console (developer.atlassian.com/console/myapps).
-
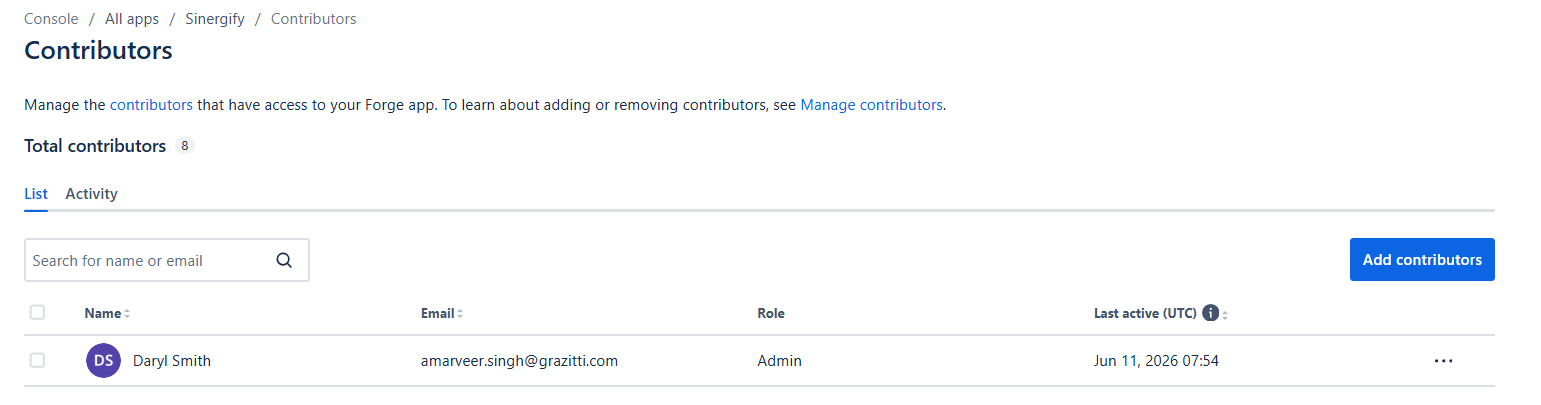
Select the relevant app (e.g., Sinergify App).
-
Select Contributors from the left menu.
-
Click Add contributors.
-
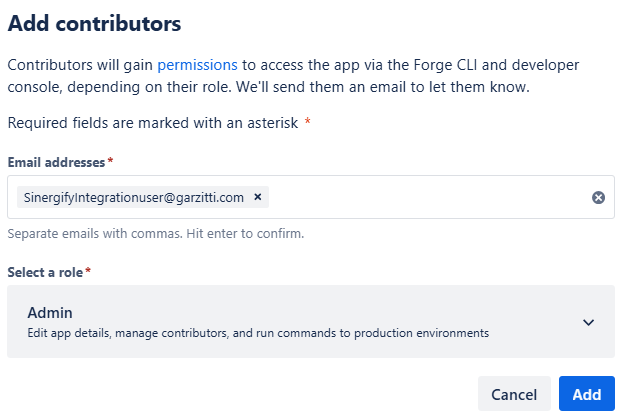
Enter the email address of the Jira integration user.
-
Select the appropriate role — Admin
-
Click Add.


Note: The integration user will receive an email notification once added and will be able to authorize the app on the Sinergify Authentication screen.
Option B — Transfer App Ownership to the Integration User
Use this when the admin wants to permanently hand the app over to the integration user, without making them an Org admin.
-
Go to the Atlassian Developer Console (developer.atlassian.com/console/myapps).
-
Select the relevant app.
-
Select Settings from the left menu.
-
Scroll down to the App ownership section.
-
Click Change owner next to the current owner's name.
-
Select the integration user as the new owner.
-
Click Confirm transfer.
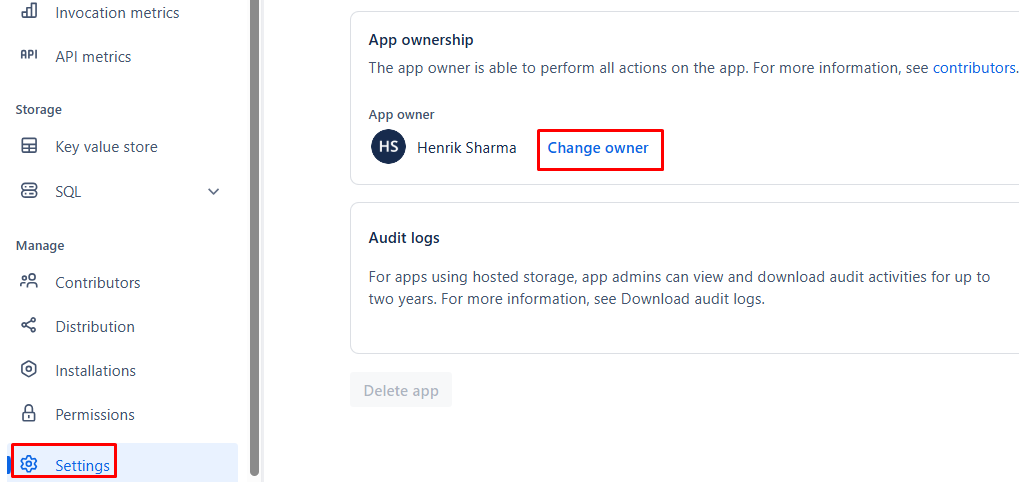

Note: The app must have at least one contributor added before ownership can be transferred. The new owner will receive an email notification upon transfer.
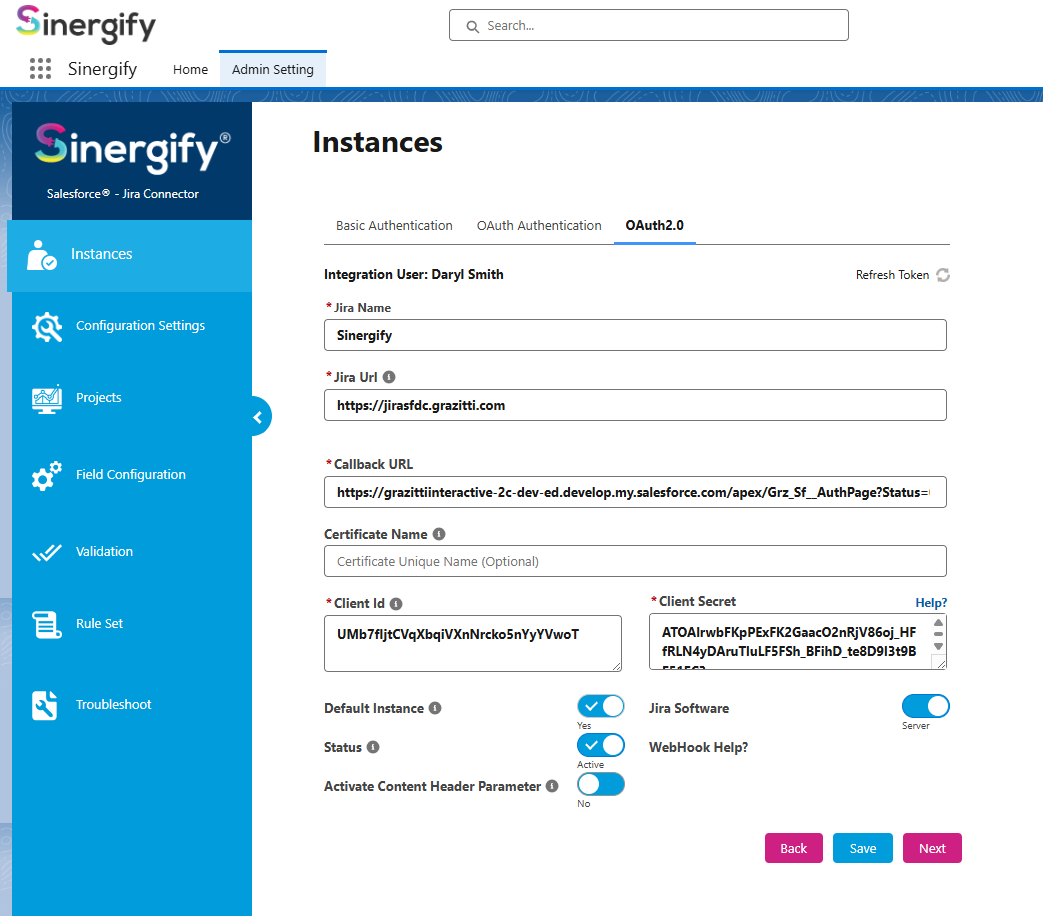
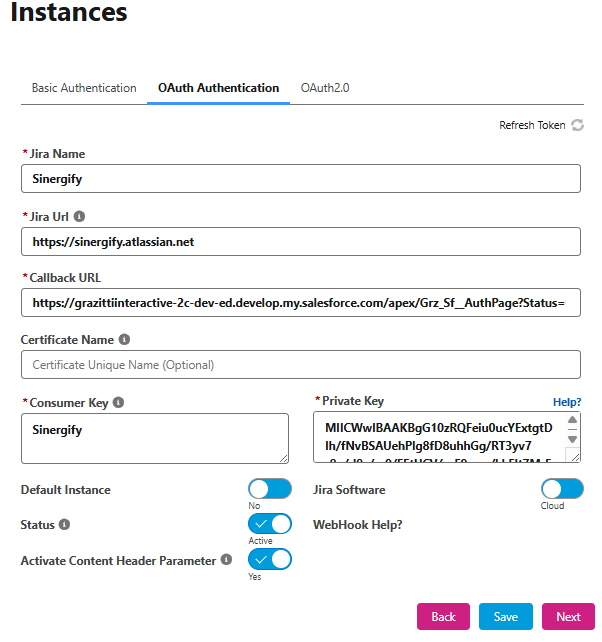
Configure Sinergify Admin Settings
-
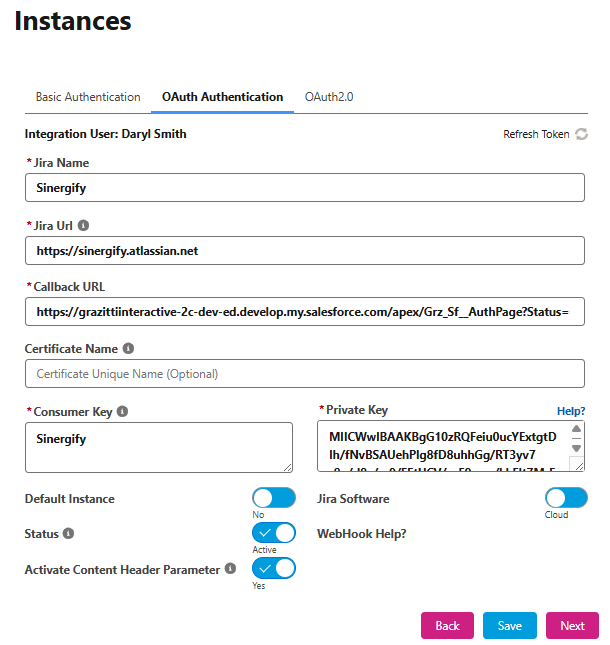
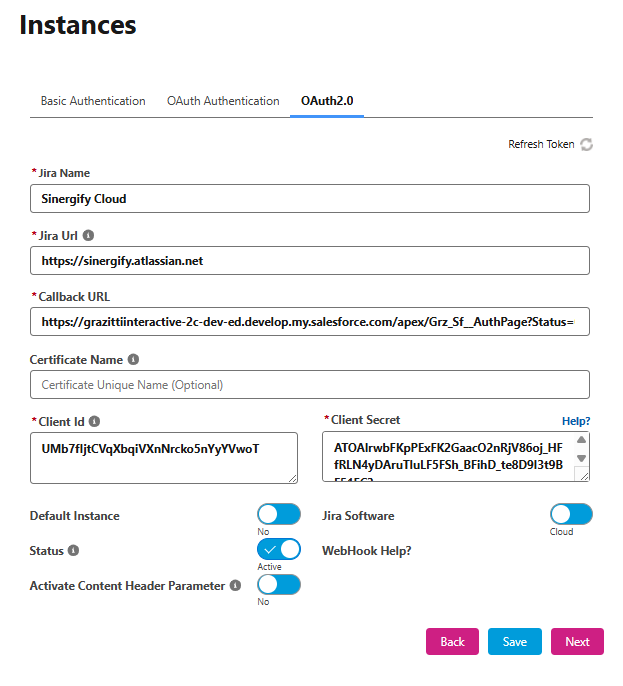
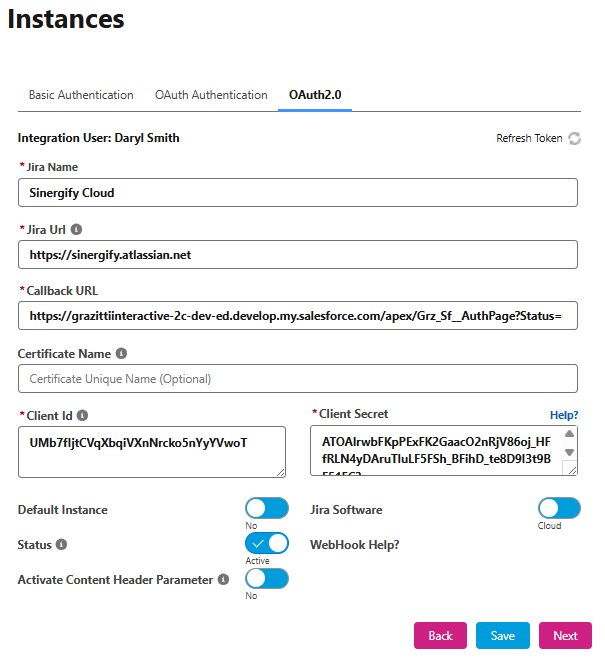
Go to Sinergify Admin Settings > Authentication > OAuth 2.0. Fill in the following fields:
| Field | What to Enter |
|---|---|
|
Jira Name |
A user-defined label for your Jira instance (e.g., 'MyProductionJira'). |
|
Jira URL |
Your Jira instance URL |
|
Callback URL |
Auto-generated when the Jira URL is entered. Verify it matches the below format: [SalesforceOrgURL]/apex/Grz_Sf__AuthPage?status=[SalesforceOrgID]&instanceUrl=[JiraInstanceUrl] |
|
Client ID |
Paste the Client ID copied from the Jira Developer Console |
|
Client Secret |
Paste the Client Secret copied from the Jira Developer Console |
|
Activate Content Header Parameter |
Enable if authenticating with Google SSO |
|
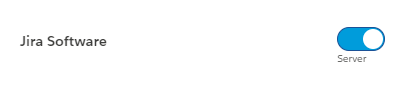
Jira Software |
Select Cloud |
|
Default Instance |
Toggle on if this is your primary Jira instance |
Important —If your organization uses SSO (such as OKTA), complete this step in an incognito/private browser window to avoid session conflicts.
-
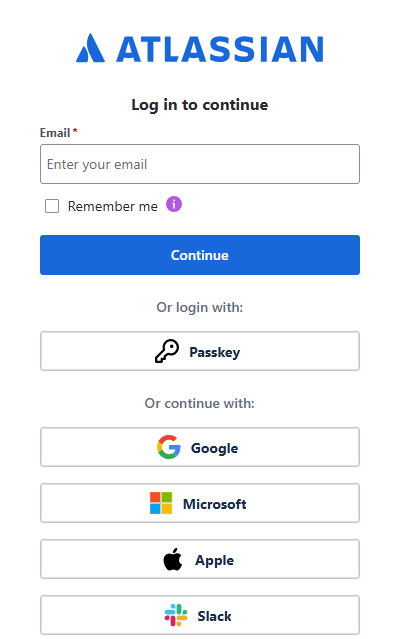
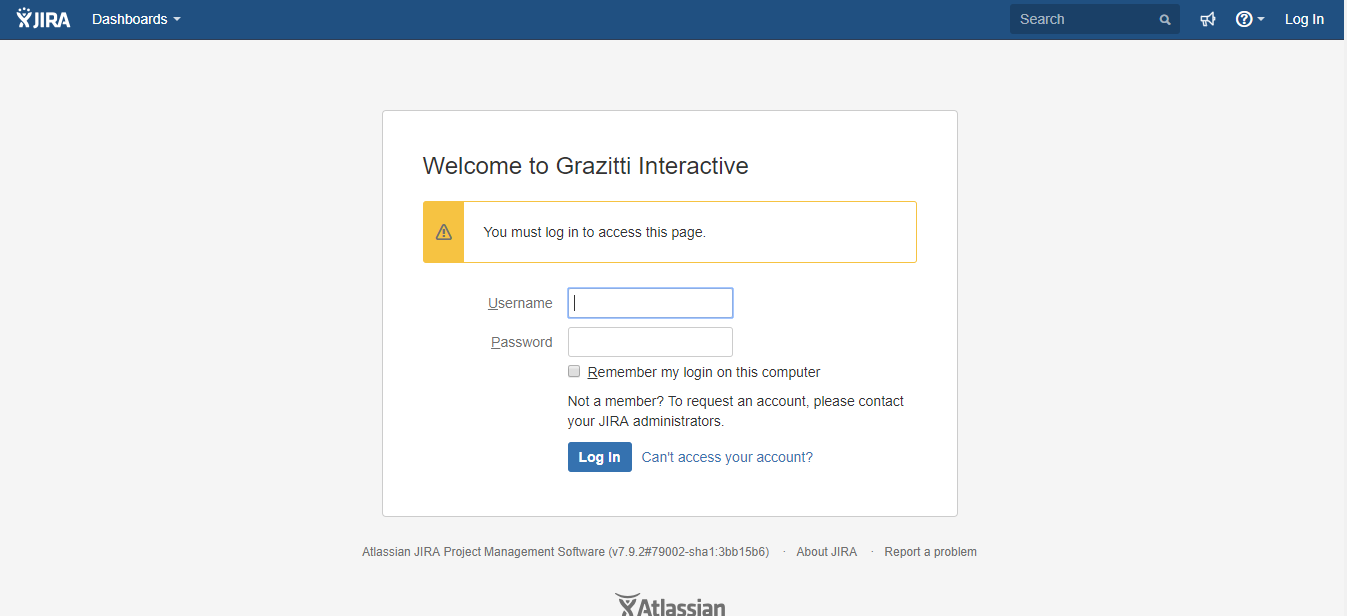
Click Save. A browser pop-up will appear automatically. Depending on your current login state:
-
If you are already logged into Jira as the integration user — the authorization screen will appear directly. Proceed to Step 2.
-
If you are not logged in — the Atlassian login screen will appear. Enter the integration user's email and click Continue, then enter the password to proceed.
-
-
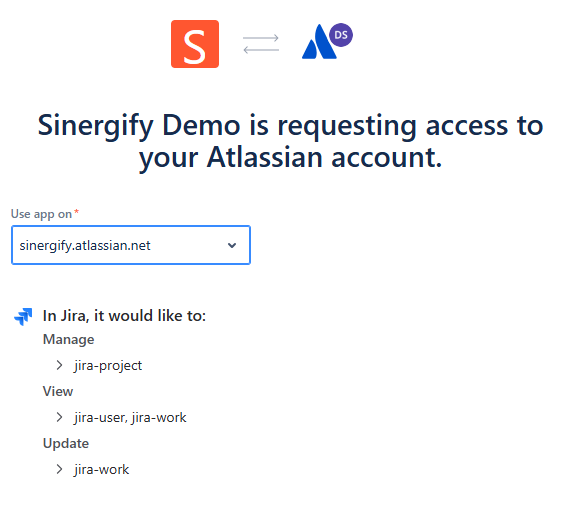
The "Sinergify is requesting access to your Atlassian account" screen will appear. In the Use app on dropdown, select your Jira instance (e.g., sinergify.atlassian.net).
-
Review the permissions Sinergify is requesting under In Jira, it would like to:
-
Manage → jira-project
-
View → jira-user, jira-work
-
Update → jira-work
-
-
Once the app is selected and permissions are reviewed, click Allow on the screen that appears.

-
The access token will be saved automatically and the admin page will reload. Verify the status is set to Active. If not, enable the toggle button.


Note: If the pop-up does not appear, ensure your browser is not blocking pop-ups for your Salesforce domain and try again.
-
The access token will be saved automatically and the admin page will reload. Verify the status is set to Active. If not, enable the toggle button.

-
OAuth 2.0 Authentication: Jira Server / Data Center
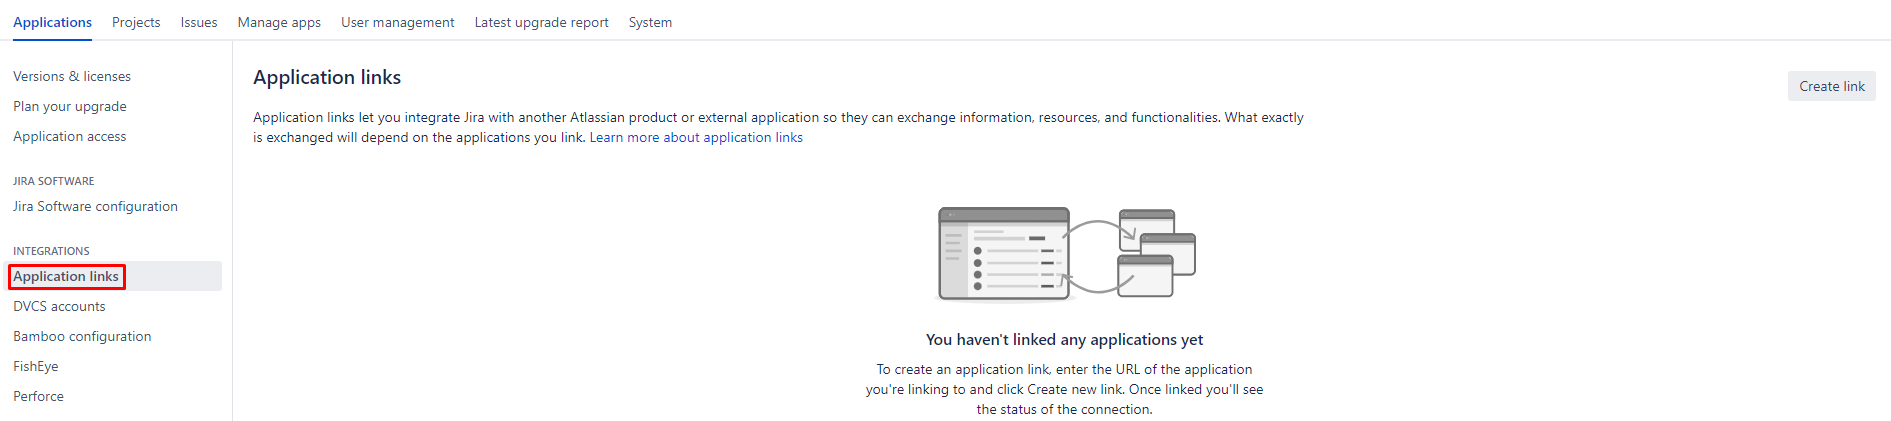
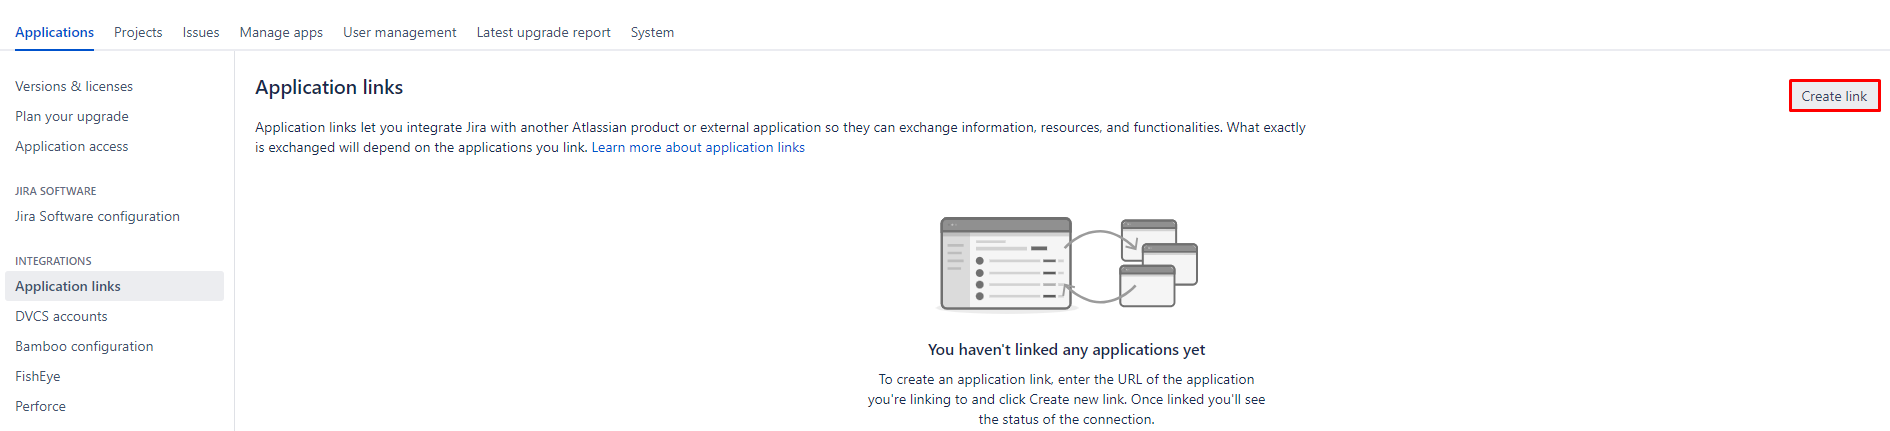
Create an Incoming Application Link
-
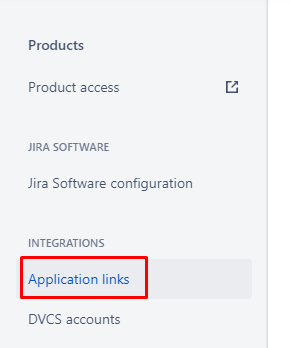
In Jira, navigate to Administration > Applications > Application links.

-
Click Create link, select External application, and set the direction to Incoming.

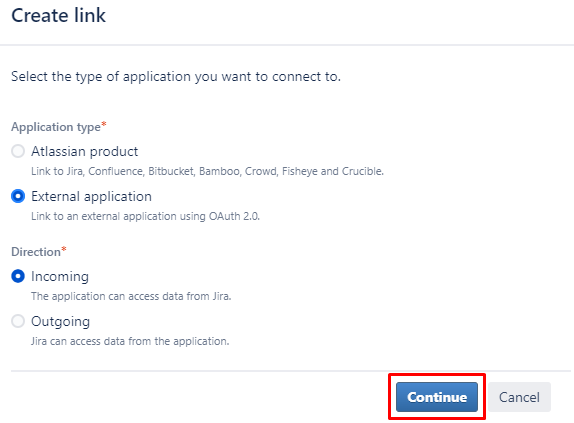
-
Provide the Redirect URL

Call back url format:
[SalesforceOrgURL]/apex/Grz_Sf__AuthPage?status=[SalesforceOrgID]&instanceUrl=[JiraInstanceUrl]
Example:
https://grazitti220-dev-ed.develop.my.salesforce.com/apex/Grz_Sf__AuthPage?Status=00DNS000002I84y2AC& instanceURL=https://jirasfdc.grazitti.com
4. Select the application permissions as per the business requirement.
-
Read
-
Write
-
Admin
-
System admin
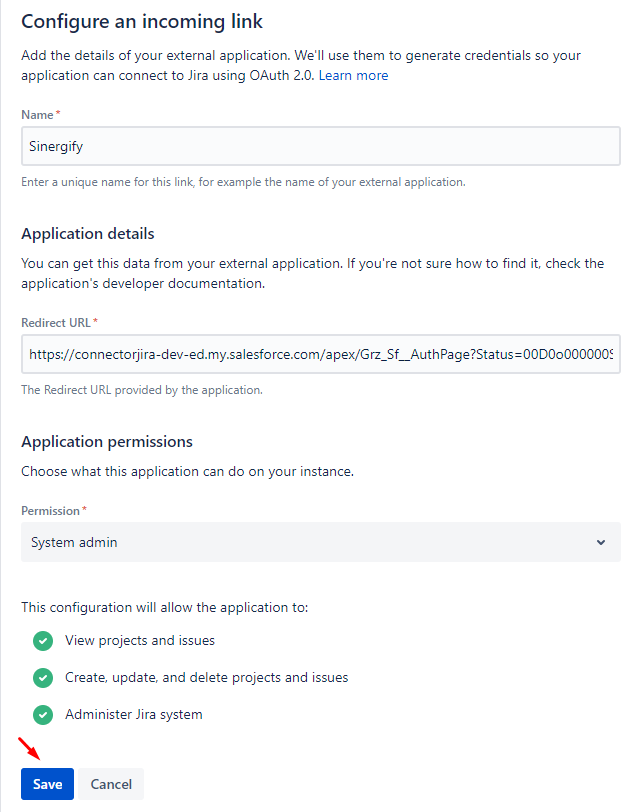

-
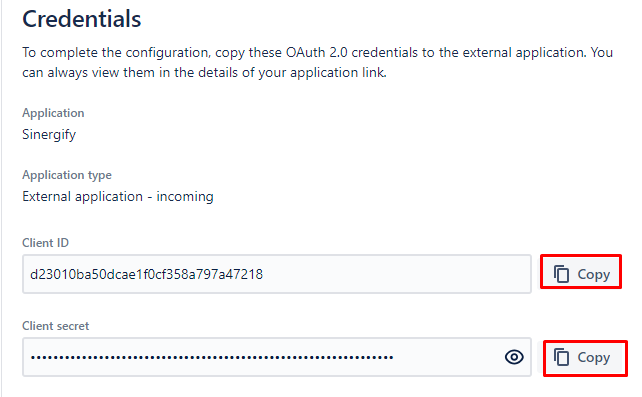
Copy the generated Client ID and Client Secret.

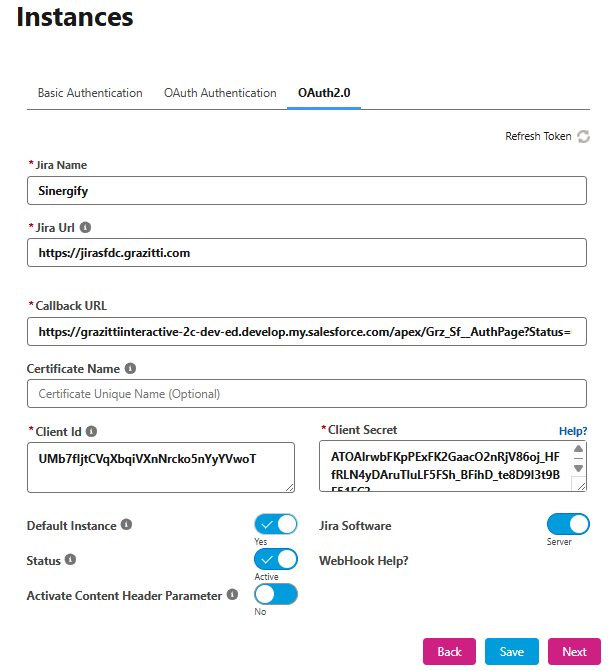
Configure Sinergify Admin Settings
-
Go to Sinergify Admin Settings > Authentication > OAuth 2.0.
| Field | What to Enter |
|---|---|
|
Jira Name |
A user-defined label for your Jira instance (e.g., 'MyProductionJira'). |
|
Jira URL |
Your Jira instance URL |
|
Callback URL |
Auto-generated when Jira URL is entered |
|
Client ID |
Paste the Client ID from the Jira application link |
|
Client Secret |
Paste the Client Secret from the Jira application link |
|
Activate Content Header Parameter |
Enable if authenticating with Google SSO |
|
Certificate Name |
Select the configured self-signed certificate (required for proxy or dynamic IP environments) |
Important —If your organization uses SSO (such as OKTA), complete this step in an incognito/private browser window to avoid session conflicts.
-
Click Save. A browser pop-up will appear automatically. Depending on your current login state:
-
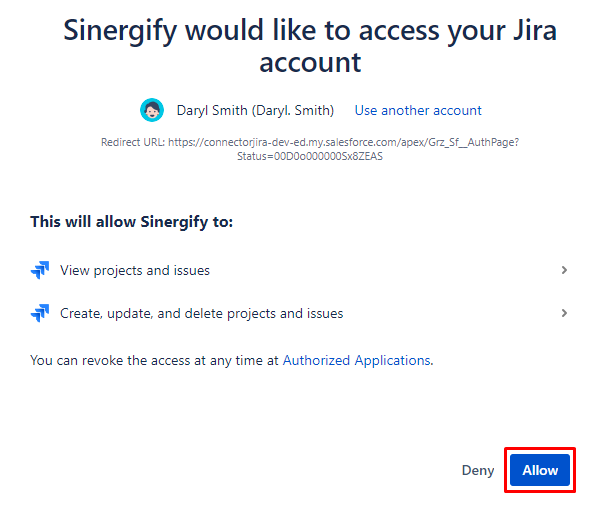
If you are already logged into Jira as the integration user: The authorization screen will appear directly with the message: "Sinergify would like to access your Jira account." Review the permissions being requested:
-
View projects and issues
-
Create, update, and delete projects and issues
Click Allow to proceed.
-
If you are not logged in: The Atlassian login screen will appear. Enter the integration user's email and click Continue, then enter the password to proceed. Once logged in, the authorization screen will appear with the message: "Sinergify would like to access your Jira account." Review the permissions and click Allow.

-
A second pop-up will appear with the message: "The application would like to store the token in your Salesforce. The application will be using this to authenticate as you in the future." Click Allow.

-
The access token will be saved automatically and the admin page will reload. Verify the status is set to Active. If not, enable the toggle button.
Note: If the pop-up does not appear, ensure your browser is not blocking pop-ups for your Salesforce domain and try again.
-
Troubleshooting
| Error / Issue | Likely Cause | Resolution |
|---|---|---|
|
"Attempt to de-reference a null object. An unexpected error has occurred. (Grz_Sf)" |
This error occurs only when the following Remote Site Settings are not configured: |
Verify the Remote Site Settings are added and Active. |
|
"You don't have access to this app. This application is in development — only the owner may grant access." |
The OAuth 2.0 app was created by a different user than the one authenticating. |
The app owner must add the integration user as a Contributor or transfer app ownership. Refer to Section 2.2. |
|
"Hmm... We're having trouble logging you in. We couldn't identify the app requesting access." |
The Client ID or Client Secret entered in Sinergify is incorrect, or the Callback URL in the Jira Developer Console does not match the one in Sinergify. |
1. Go to the Jira Developer Console > Settings > Authentication details and re-copy the Client ID and Client Secret carefully. 2. Verify the Callback URL in the Jira Developer Console under Authorization matches exactly with the Callback URL in Sinergify Admin Settings. 3. Save and try authorizing again. |
|
Pop-up blocked during authorization |
Browser is blocking the OAuth authorization pop-up. |
Allow pop-ups for your Salesforce domain in browser settings, then click Save again. For SSO/OKTA users, try in incognito window. |
|
Status not showing as Active after authorization |
The token was not saved correctly, or the wrong Jira user authorized the connection who does not have permission |
Toggle the Status button in Sinergify Admin Settings. If it does not become Active, re-authorize using the correct Jira integration user account. |
Note: If you encounter an issues please contact Sinergify support .
Note: Jira has deprecated OAuth 1.0 for application links. You can transition to OAuth 2.0 for enhanced security and continued functionality.
Configure Remote Site Settings
-
Navigate to the Setup page from your Salesforce instance. In the Quick Find box, search for Remote Site Settings and click on it from the search results.

-
Click New Remote Site to add the remote site.


Creating Remote Sites
-
Jira Instance
Remote Site Name: Provide a name like ‘Jira’.
Remote Site URL: Enter the URL of your Jira instance to enable secure communication.

-
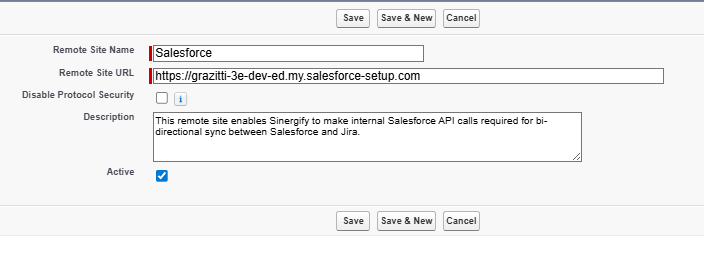
Salesforce Instance
Remote Site Name: Provide a name like ‘Salesforce’.
Remote Site URL: Enter your Salesforce instance URL to ensure seamless integration and communication.

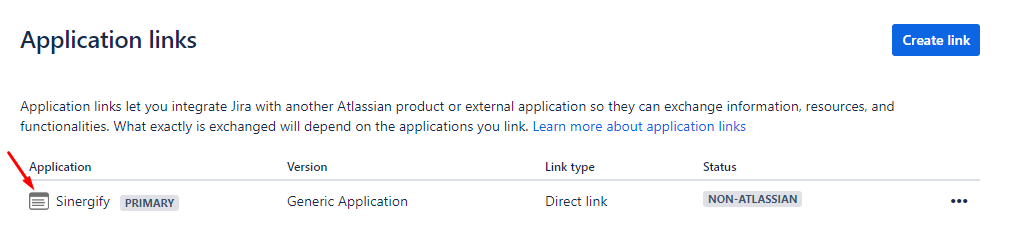
Create Application Links on the Jira Side
-
Log into your Jira system as a user with Jira Administrator permissions.
-
Click on the Gear (settings) icon.
-
Under the Settings drop-down menu, click System.
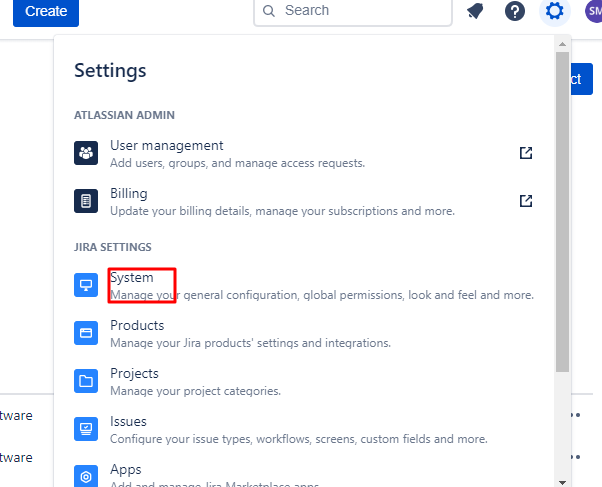
-
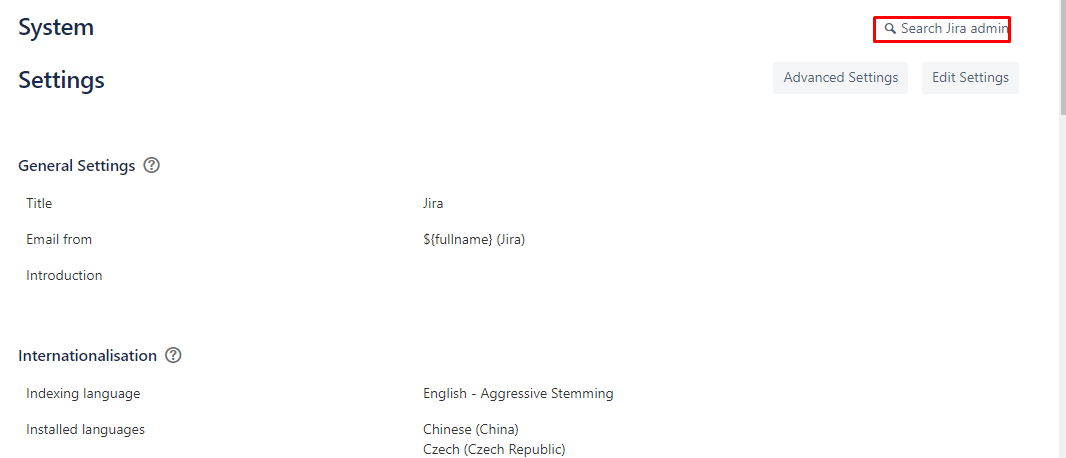
Click Search Jira admin.
-
Enter application in the search bar and click Application links from the search results.
-
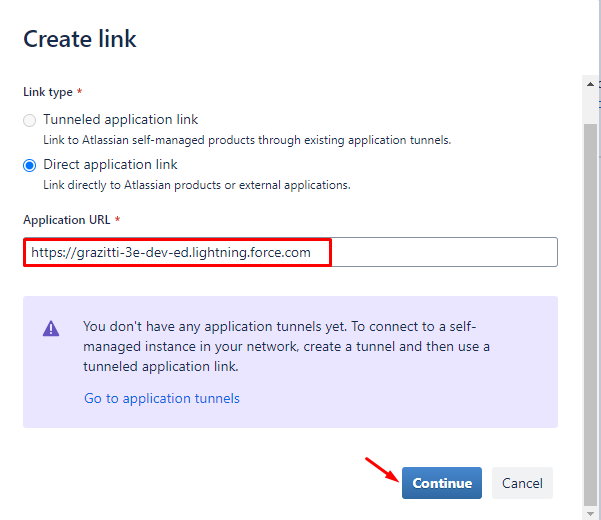
Click on Create link.
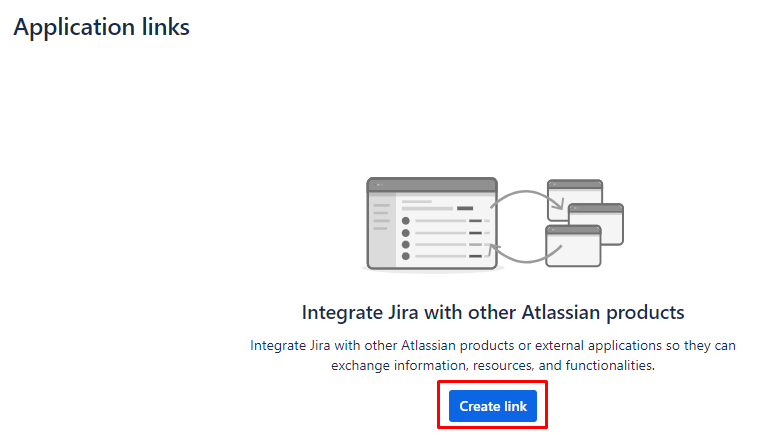
-
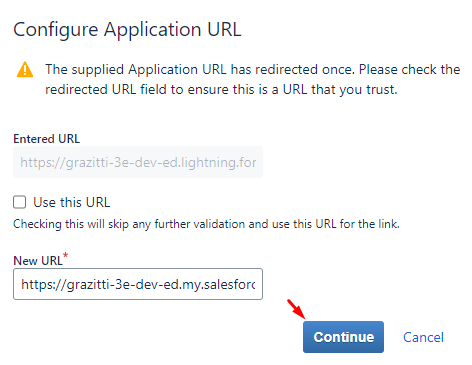
Enter your Salesforce Org’s URL in the field and click Create new link.

-
A new window will open to confirm the New URL. Click Continue.
-
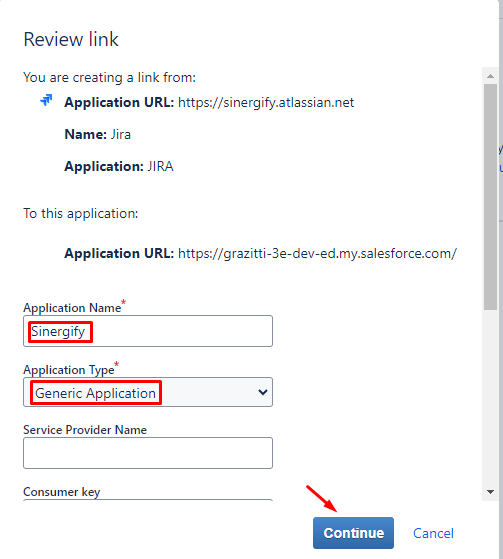
Fill in the details like Application Name and select Generic Application as the Application Type. Click Continue.


-
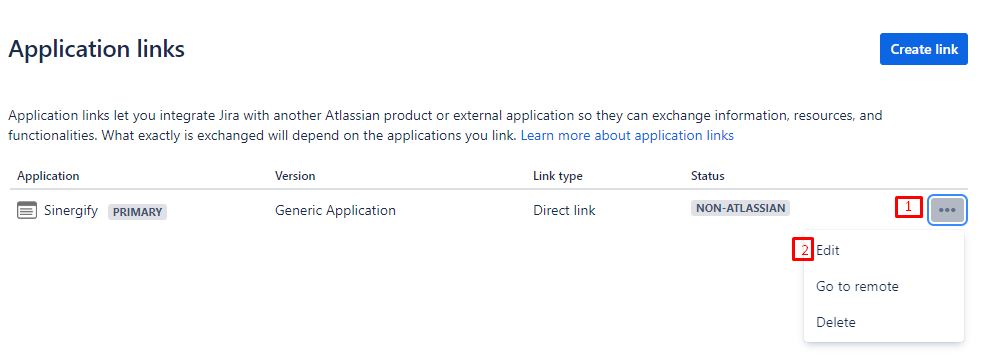
A new application link will be created.

-
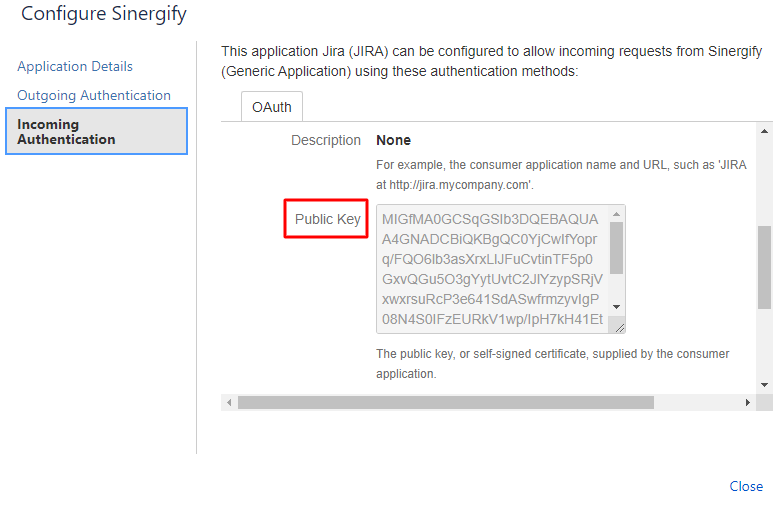
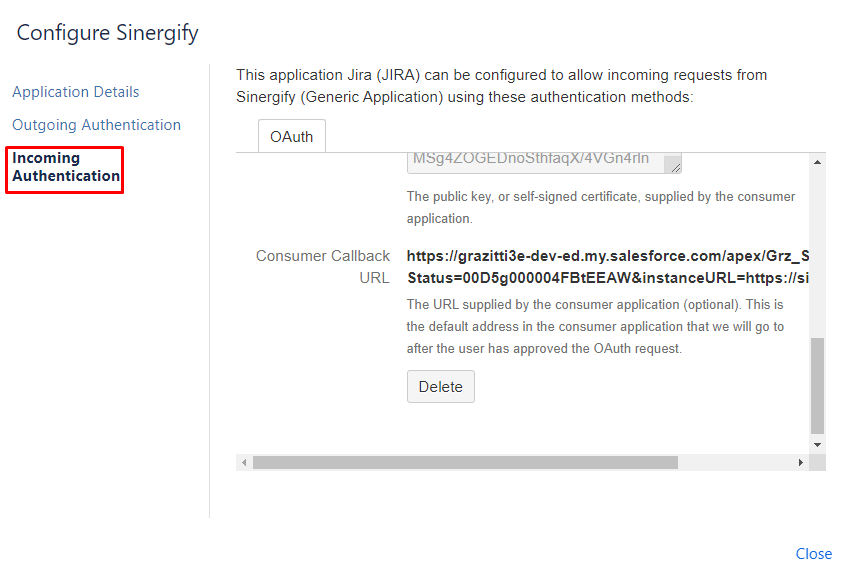
Next is setting up the Incoming Authentication. Click Edit.
-
Enter Sinergify in the Consumer Key and Salesforce in the Consumer Name fields.


Note:
-
Please check this reference Document for Public/Private keys. Please save the Private key also as it will be required later.
-
Add your Consumer Callback URL in the required format.
E.g.
https://grazitti3e-dev-ed.my.salesforce.com/apex/Grz_Sf__AuthPage?Status=00D5g000004FBtEEAW&instanceURL=https://sinergify.atlassian.net
-
Click Save. The status of the application link will be updated to Configured.

-
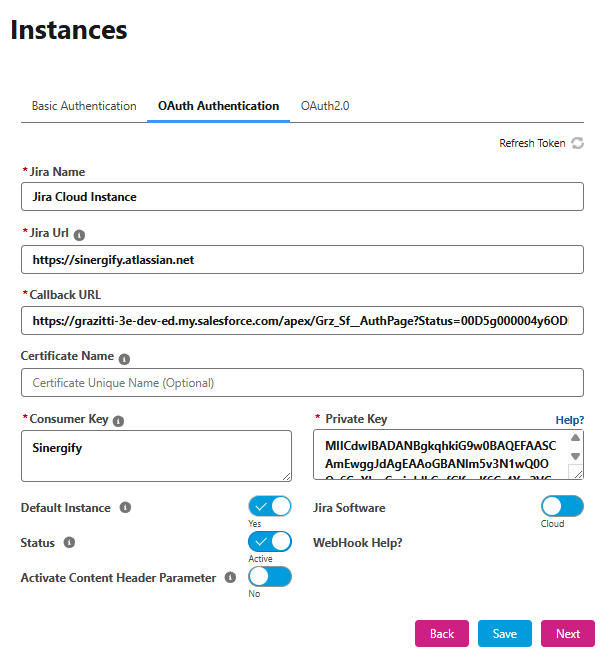
Go to the Authentication tab of the Admin Settings (Sinergify app) and select the OAuth tab and fill in the details below.

-
Jira Name: Provide your Jira instance Name
-
Jira URL: Provide your Jira instance URL.
-
Call back URL: This field is automatically generated when the Jira URL is entered. The URL follows the format below:
SalesforceOrgURL+’/apex/Grz_Sf__AuthPage?status=’+SalesforceOrgID+’&instanceUrl=’+Jira instance Url
-
Certificate Name:
-
Select the configured self-signed certificate from Salesforce. This certificate secures the communication between Salesforce and Jira and helps maintain a stable connection in environments with proxies or dynamic IP changes.
-
Applicable for Jira On-Premise / Data Center (DC) environments.
-
For detailed certificate creation and configuration, please follow the steps outlined above in this document
-
-
Consumer Key: Enter the Consumer key used in the Application link.
-
Private Key: Enter the Private key generated in step 13 above.
-
Activate Content Header Parameter: Enable the toggle button to authenticate with Google SSO, facilitating single sign-on using Google credentials.

Key Consideration Points.
-
A consumer key must be one word only, as Jira does not support more than one word in a consumer key. See the reference Document.
-
Refresh Token: A refresh token helps you re-validate your connection. It is particularly useful when the token expires or is revoked on the Jira side. This can also be used to authenticate the Salesforce side with a different Jira Integration user if needed.
-
Select the Jira software - Server or Cloud.

-
Toggle to make this Jira instance your default Jira instance.

-
Click ‘Save'.


-
A Pop-up will appear on your screen. Log in using your Jira credentials.
Note. Ensure that pop-ups are not blocked.

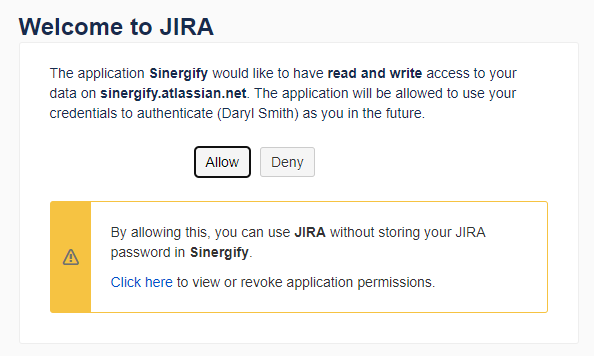
-
After logging in, a new window will appear asking for the ‘Read’ and ‘Write’ permissions. Click ‘Allow’ to share access token else click ‘Deny’.

-
A new window will appear on your screen asking you to allow or deny the access

-
If allowed, the access token will be shared and saved automatically in Salesforce and the admin page will reload automatically.
-
After this process is complete, you will be able to view the Integration user details. Please ensure the status is set to Active. If it is not, enable the toggle button.