
 Feedback
Jira Cloud Plugin
/Jira Cloud Plugin (1)_1.png) Important!
Important!
This documentation is related to Jira Plugin Version 4.0.3-AC. In order to leverage all the latest features of Plugin on your respective Cloud/Server Instance, kindly make sure your Salesforce side package requirements are met. i.e. Sinergify Package on Salesforce should be updated to Version 6.x or above from AppExchange.
For Queries drop us an email at [email protected].
Sinergify plugin allows Jira users to sync Jira updates to Salesforce. With configurable syncing, the admin can decide what updates to be synced from Jira to Salesforce. Along with controlled syncing, the Jira plugin now also offers additional capabilities for Jira Users. Refer to the below use-cases for an overview.
Jira Plugin Use Cases
Create Salesforce Records from Jira.
There are two ways to create Salesforce records from Jira: manually, by using the Create button, or automatically, based on conditions configured in the Salesforce settings screen:
-
Auto-Creation of Salesforce Records
The user can automatically create Salesforce records from Jira when specific conditions are met, reducing manual effort by ensuring records are generated when predefined criteria are met.
Define the Auto Create Rule
In the Salesforce settings, configure the rule to specify when a Salesforce record should be auto-created.
For example:
-
Connector Corp Field: Autocreate Salesforce record
-
Value: Yes/No
/Jira Cloud Plugin(Latest version)_2.png)
Update the Field Value in Jira
When the Jira field Autocreate Salesforce record is set to Yes, and the configured condition is met (e.g., during a field update), a Salesforce record is automatically created.
/Jira Cloud Plugin(Latest version)_3.png)
Note: The Autocreation will work for the Text Field, Text Area, Checkboxes, Single Select, or Multi-Select Jira fields.
-
Manual Creation of Salesforce Records
The users can create Salesforce records directly from Jira. This feature will show all the mapped Salesforce fields relevant to the current object and project.
Let's see an example of a Salesforce Case.
Find the Jira Plugin and then select the Create Button as Highlighted below.
/Jira Cloud Plugin(Latest version)_4.png)
A new form will appear.
/Jira Cloud Plugin(Latest version)_5.png)
Review and update the fields. On the right side the Potential results section will appear with the similar cases, you can also link the case from Potential results.
/Jira Cloud Plugin(Latest version)_6.png)
Once you click on Create. A new Salesforce record will be created in Jira. The newly created record will be linked to the Jira record and will be visible at the top of the list.
/Jira Cloud Plugin(Latest version)_7.png)
Click on the Redirect button to open the record inside the Salesforce environment. The visibility of the Redirection button can be controlled from the Configuration Panel.
/Jira Cloud Plugin(Latest version)_8.png)
The Salesforce login screen will appear. After entering the login details you will be redirected to the Salesforce Case Environment.
/Jira Cloud Plugin(Latest version)_9.png)
/Jira Cloud Plugin(Latest version)_10.png)
-
Bulk Case Creation
Bulk Case Creation enables users to create multiple Salesforce Case records at once by uploading a CSV file from the Sinergify panel. This reduces manual effort and accelerates case creation. Admins can control access to this feature using the Allow Bulk Record Creation toggle in Sinergify Configuration.
 (1)/Jira Cloud Plugin(Latest version) (1)_11.png)
Note: Bulk Case Creation is currently supported only for the Case object and is not available for other Salesforce objects.
Upload from Sinergify Panel
When enabled, an Upload button appears in both Compact View and List View of the Sinergify panel.
 (1)/Jira Cloud Plugin(Latest version) (1)_12.png)
Bulk Upload Flow
A. Upload CSV
Users upload a .csv file to initiate bulk case creation.
Points to remember:
-
Only CSV files are supported.
-
If a Jira field is not mapped to the Case field in the Salesforce setting screen, the system will attempt to auto-map the Case field with a CSV column.
-
This auto-mapping is based on a match between the Case field API name and the CSV column header.
-
To enable this, the CSV file must use the Case field API names as column headers.
B. Field Mapping
A mapping screen is displayed where:
-
Salesforce Case fields appear on the left.
-
Fields can be mapped to:
-
Jira fields, or
-
CSV columns.
-
-
Auto-mapping occurs when CSV headers match Case field API names.
-
Users can review and edit the field mappings on this screen before proceeding.
 (1)/Jira Cloud Plugin(Latest version) (1)_13.png)
C. Create Records
Click Create to confirm and create multiple Case records in a single action.
A confirmation popup appears, displaying the total number of records to be processed.
-
Click OK to confirm and create the records.
-
Click Cancel to return and review or edit the field mappings.
 (1)/Jira Cloud Plugin(Latest version) (1)_14.png)
Once completed, records are created successfully, and the Success and Failure CSVs are attached to the related Jira issue.
Search and Link Salesforce Records
Find the Sinergify Application on the Jira Record Panel.
Sinergify Application Panel on the Right Side:
The Right Side Compact view will show up to 5 fields of the mapped Salesforce Object for a quick glance.
/Jira Cloud Plugin(Latest version)_11.png)
Sinergify Application Panel on Left Side:
The left Side List View can show up to the ‘n’ Number of fields of the mapped Salesforce Object for a detailed view.
Select the link button as shown below, to link an existing Salesforce record.
/Jira Cloud Plugin(Latest version)_12.png)
/Jira Cloud Plugin(Latest version)_13.png) [Link an existing Salesforce record from Sinergify List View]
[Link an existing Salesforce record from Sinergify List View]
/Jira Cloud Plugin(Latest version)_14.png) [Link an existing Salesforce record from Sinergify Compact View]
[Link an existing Salesforce record from Sinergify Compact View]
A new window will open. Search the Salesforce records by typing the appropriate keywords in the search field and then click on the Search icon.
/Jira Cloud Plugin(Latest version)_15.png)
Select the records that you want to link from available search results. Once selected click Link.
The specific record will now be linked to the Jira ticket.
/Jira Cloud Plugin(Latest version)_16.png)
View Linked Salesforce Record Details
You will see the linked records within the Sinergify App Under the Specific Object. For. eg. Case, as shown below.
/Jira Cloud Plugin(Latest version)_17.png)
/Jira Cloud Plugin(Latest version)_18.png)
[Viewing a Salesforce record overview from Sinergify Compact View]
To see a more detailed view of the linked Salesforce record, click the Pop Out Icon as shown in the images below.
/Jira Cloud Plugin(Latest version)_19.png)
[Compact View: Open Salesforce Record Detailed View via Pop-Up]
/Jira Cloud Plugin(Latest version)_20.png)
[List View: Open Salesforce Record Detailed View via Hyperlink]
A new window will pop up, and you will see the four tabs along with the Case object Details i.e. Case Number.
-
Details
-
Comments
-
Feed posts
-
Emails
Details
This tab is used to show all the fields that are selected under the configuration screen for the linked SF record.
/Jira Cloud Plugin(Latest version)_21.png)
Comments
The comments tab will display all the case comments posted in Salesforce. We can also post the Case comments from Jira, posted comments will be displayed along with the signature. The Tab visibility can be controlled by a Jira Admin.
/Jira Cloud Plugin(Latest version)_22.png)
Feed Post
The feed post will display all the Feed items of the current Salesforce record and we can also create a feed post from Jira where posted feeds will be displayed along with the signature. The Tab visibility can be controlled by a Jira Admin.
/Jira Cloud Plugin(Latest version)_23.png)
Points to remember:
-
The feed post tab will also have support for Rich Text .
-
The feed post tab will be available for only those Salesforce objects whose feed is enabled under Salesforce. Jira Admin can further control tab visibility as explained below under ‘Install and Setup Plugin in Jira’.
Emails
In the email messages tab you can see all the Emails of the Current Salesforce Record. The tab visibility can be controlled by the Jira Admin.
Note: The Email to Case must be enabled in Salesforce.
-
Go to setup and search ‘Email-to-Case’.
-
Select Email-to-Case from the search results under Service Setup.
-
A new screen will appear, click on the ‘Enable Email-to-Case’ checkbox.
/Jira Cloud Plugin (1)_22_thumb_0_0.png)
/Jira Cloud Plugin (1)_22.png)
/Jira Cloud Plugin(Latest version)_25.png)
Unlink Salesforce records
If you wish to remove a Salesforce record that is already linked to the current Jira, select Unlink. Multiple records can be unlinked at once. Click on the checkbox to 'Unlink' the records.
/Jira Cloud Plugin(Latest version)_26.png)
After clicking the ‘Unlink’ button, choose the checkbox next to the case you wish to unlink. A pop-up will appear showing the records. Continue by selecting the 'Unlink' button.
/Jira Cloud Plugin(Latest version)_27.png)
Let's follow the step by step configuration guide below to achieve the above use cases.
Setup Plugin in Salesforce via External Client App
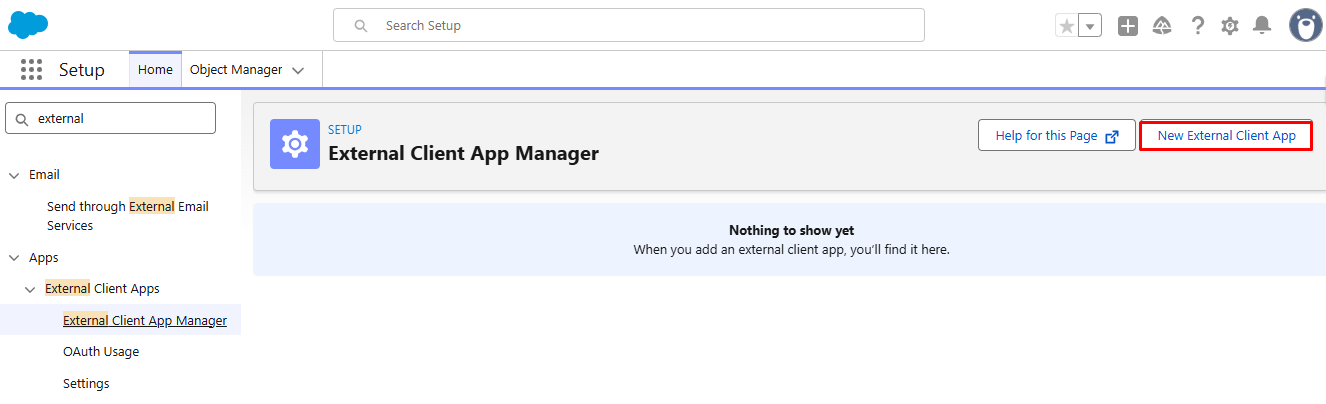
Step 1: Open External Client App Manager.
Log in to your Salesforce org and navigate to Setup. In the Quick Find search box, type External Client App Manager and select it from the results.
Click the New External Client App button on the top right.
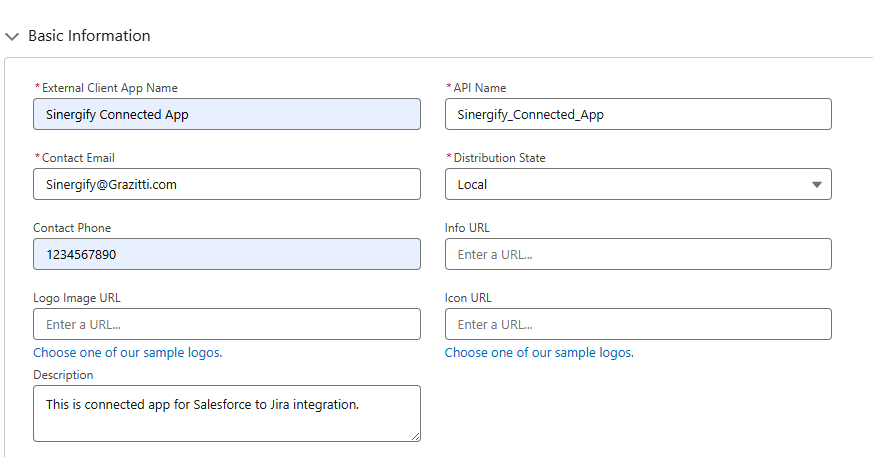
Step 2: Fill in Basic Information
Enter the following details under the Basic Information section:
-
External Client App Name: Enter a name for reference and easier identification. E.g., Sinergify Connected App Or Sinergify - Jira Prod.
-
Contact Email: Enter the administrator's email address. This helps in identity verification when Viewing the Client Key and Secret or Modifying the application
-
Distribution State: Select Local. This indicates the app is used within your org only.
-
Contact Phone (Optional): Enter a contact number. This helps in identity verification when Viewing the Client Key and Secret or Modifying the application
-
Description (Optional): Briefly describe the app's purpose. This helps to easily identify the application’s purpose across other applications.
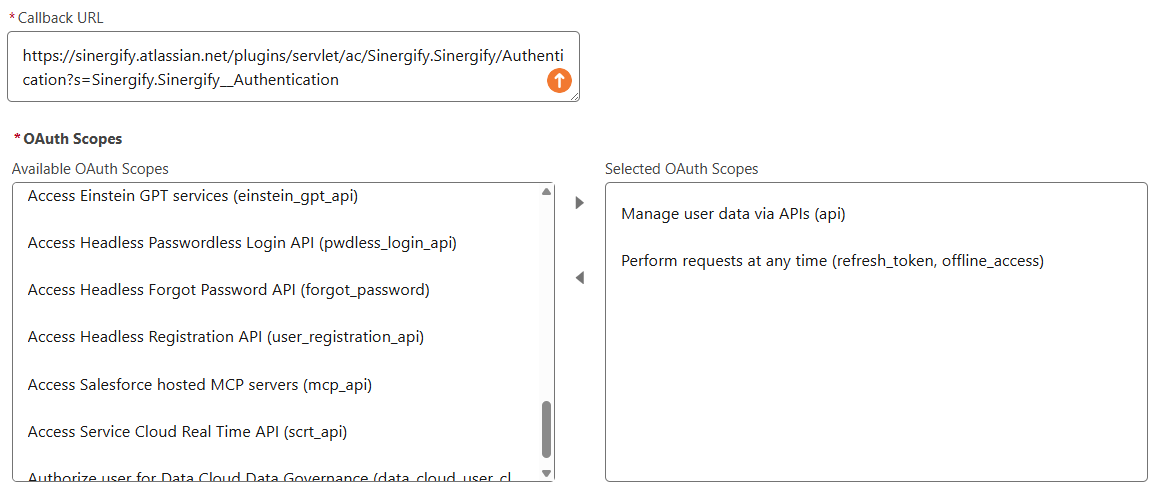
Step 3: Enable OAuth Settings
Expand the API (Enable OAuth Settings) section and check the Enable OAuth checkbox.
Under App Settings, configure the following:
-
Callback URL – Enter your Jira Sinergify callback URL in the format: JiraInstanceURL/plugins/servlet/ac/Sinergify.Sinergify/Authentication?s=Sinergify.Sinergify__Authentication
Example: https://sinergify.atlassian.net/plugins/servlet/ac/Sinergify.Sinergify/Authentication?s=Sinergify.Sinergify__Authentication
-
OAuth Scopes – Add the below scopes in your Connected app/External client app
-
Manage User Data via APIs (api): Helps in Read/Write access for Salesforce records through APIs
-
Scope: Perform Requests at Any Time (refresh_token, offline_access): Keeps the connection alive for months or years without requiring re-authorization

-
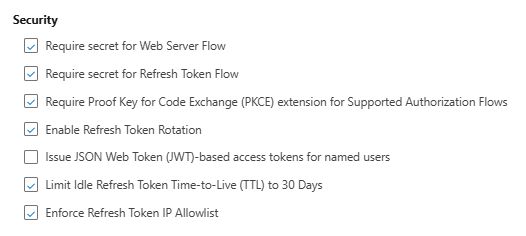
Step 4: Configure Security Settings
Scroll to the Security section and enable the following checkboxes. Salesforce recommends the below options for improved security. Reference Salesforce Article
-
Require Secret for Refresh Token Flow: Enable to secure token exchanges. Sinergify supports this setting. Enable it to secure token exchanges.
-
Require Proof Key for Code Exchange (PKCE) extension: Enable to prevent authorization code interception.
-
Enable Refresh Token Rotation: Enable to invalidate old tokens upon issuance of new ones.
-
Limit Idle Refresh Token TTL to 30 Days: Enable to cap idle token lifespan.
-
Enforce Refresh Token IP Allowlist: Enable to restrict requests to trusted IP ranges.
When you enable Enforce Refresh Token IP Allowlist, Salesforce will only permit token redemptions from IP addresses you register. You must add Sinergify's server IP to this list for the integration to authenticate successfully. Contact [email protected] to request the IP range.
Important: Enabling it without the correct IP will cause all authentication attempts from Sinergify to fail.
Reference Security Toggles for CAs and ECAs
Step 5: Save the External Client App
Click Save to create the External Client App.
Step 6: Retrieve Consumer Key and Consumer Secret
After saving, open the newly created External Client App and navigate to the Settings tab.
Under the OAuth Settings section, click Consumer Key and Secret. You may be prompted to verify your identity. Copy the Consumer Key and Consumer Secret values — these will be required when authenticating the Sinergify plugin in Jira (refer to the Authentication section under Install and Setup Plugin in Jira).

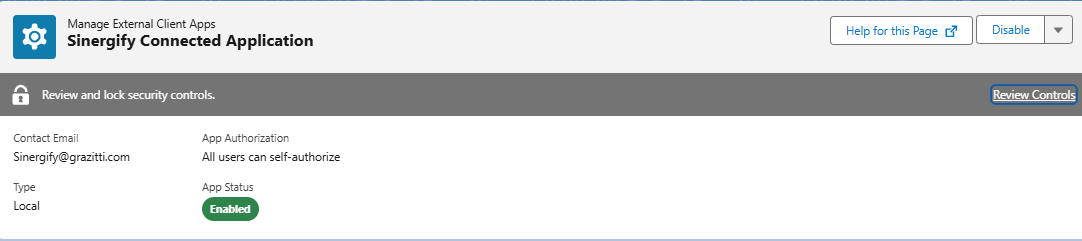
Step 7: Lock Security Controls
After enabling and verifying all security settings, lock them to prevent unauthorized changes to your integration configuration.
In the External Client App Manager, locate your app. A banner will appear at the top of the page with the message "Review and lock security controls." Click Review Controls.
The Confirm and Lock Security Controls dialog will appear, showing the current state of each security toggle.

Before clicking Confirm, verify the following:
-
Require PKCE Extension is enabled
-
Enable Refresh Token Rotation is enabled
-
Limit Idle TTL to 30 Days is enabled
-
Enforce Refresh Token IP Allowlist is enabled — only proceed if you have already contacted Sinergify support and confirmed the server IP has been registered against your app.
Once all settings are verified, click Confirm to lock the controls.
Important:
Salesforce recommends locking these controls as a security best practice to prevent accidental changes that could disrupt the integration. Once locked, these security controls cannot be modified by your org administrators. Only Salesforce Customer Support can make further changes. Ensure the integration is fully tested and working correctly in your environment before locking.Install and Setup Plugin in Jira
Installation
Select Apps, under the drop-down menu select, Find new apps in your Jira instance.
/Jira Cloud Plugin(Latest version)_40.png)
Enter Sinergify in the Search for apps input box and press enter.
/Jira Cloud Plugin(Latest version)_41.png)
Select Sinergify under the results.
/Jira Cloud Plugin(Latest version)_42.png)
Select Get App to install the application in the background. Follow the steps below once the app is installed.
Authentication
In the Apps drop-down, select Manage your apps.
Note: After the new Jira UI changes, if you are unable to locate the Authentication screen via the navigation menu, you can directly open it using the link below. Bookmark it for quick access:
Url: https://your-domain.atlassian.net/plugins/servlet/ac/Sinergify.Sinergify/Authentication?s=Sinergify.Sinergify__Authentication (Replace your-domain with your Jira instance domain)
Example: https://sinergify.atlassian.net/plugins/servlet/ac/Sinergify.Sinergify/Authentication?s=Sinergify.Sinergify__Authentication
/Jira Cloud Plugin(Latest version)_43.png)
Select Authentication under the Sinergify sub-section on the left panel.
/Jira Cloud Plugin(Latest version)_44.png)
The authentication screen will appear.
/Jira Cloud Plugin(Latest version)_45.png)
Option to 'Enable or Disable the Plugin' Sinergify plugin allows updates to sync from Jira to Salesforce. With configurations, the admin can decide what updates to be synced from Jira to Salesforce, configure the Salesforce component on Jira View, Salesforce record creation and linking from Jira.
/Jira Cloud Plugin(Latest version)_46.png)
Choose the environment from the Choose Salesforce Instance Type and then Enter the Consumer key and Client secret.
/Jira Cloud Plugin(Latest version)_47.png)
Select Login to Salesforce. This will redirect you to the Salesforce login page. Type in your credentials and Select ‘Allow’ on the Allow Access pop-up screen.
/Jira Cloud Plugin(Latest version)_48.png)
Once the Authentication is successful, you will be redirected to the Jira authentication screen with the status connected.
/Jira Cloud Plugin(Latest version)_49.png)
Select Next to Setup the Event Configuration screen.
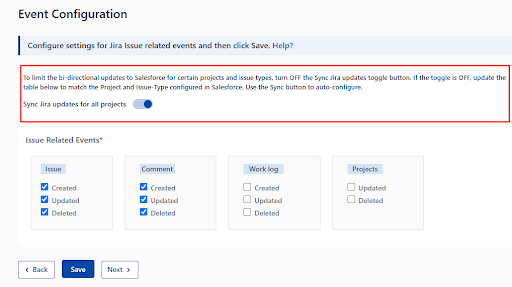
Event Configuration
Event Configuration is used to Configure settings for Jira Issue related events.
Note: After the new Jira UI changes, if you are unable to locate the Event Configuration screen via the navigation menu, you can directly open it using the link below. Bookmark it for quick access:
https://your-domain.atlassian.net/plugins/servlet/ac/Sinergify.Sinergify/EventConfiguration? s=Sinergify.Sinergify__EventConfiguration (Replace your-domain with your Jira instance domain)
Example:
https://sinergify.atlassian.net/plugins/servlet/ac/Sinergify.
Sinergify/EventConfiguration?s=Sinergify.Sinergify__EventConfiguration
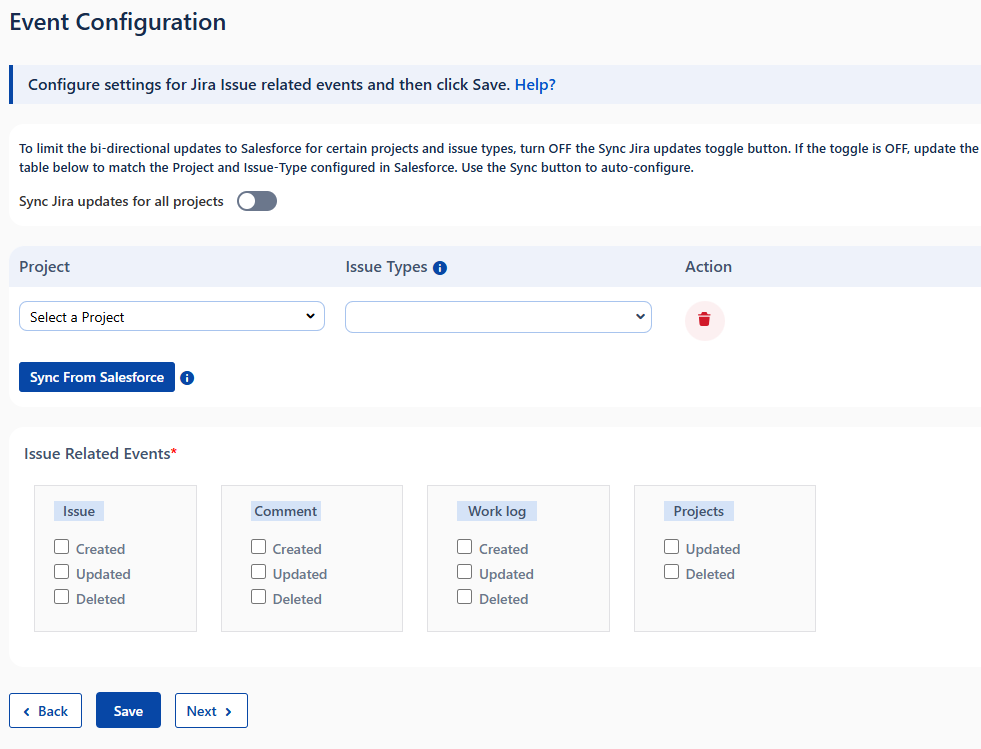
Issue related events: Select the Issue-related events for which the events should work.
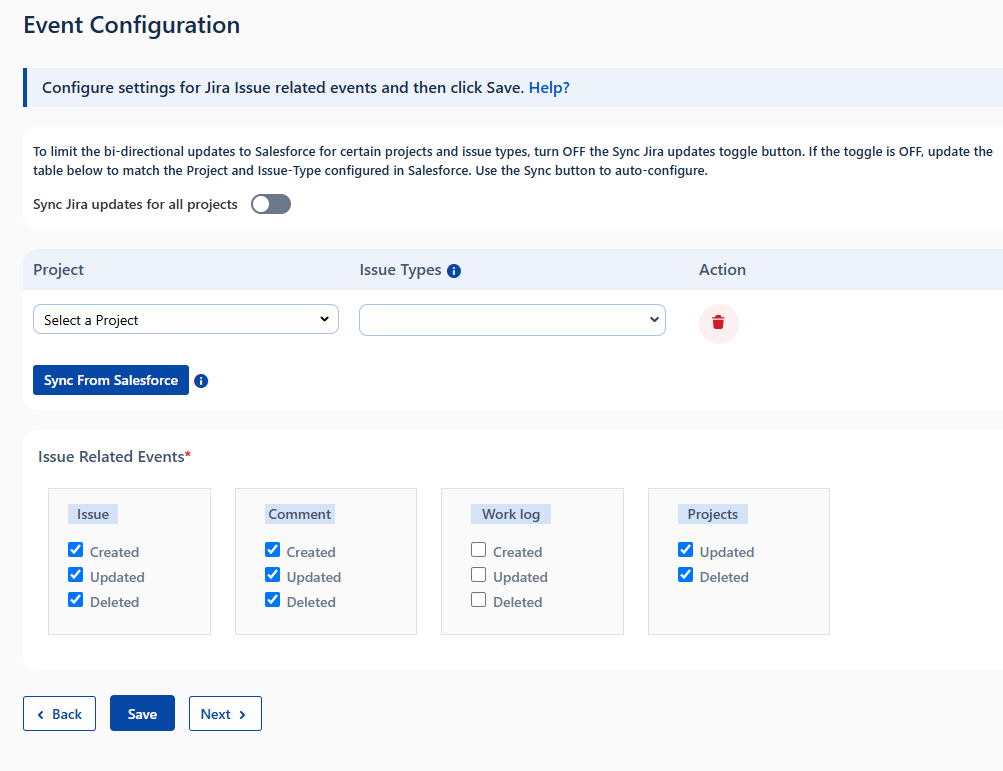
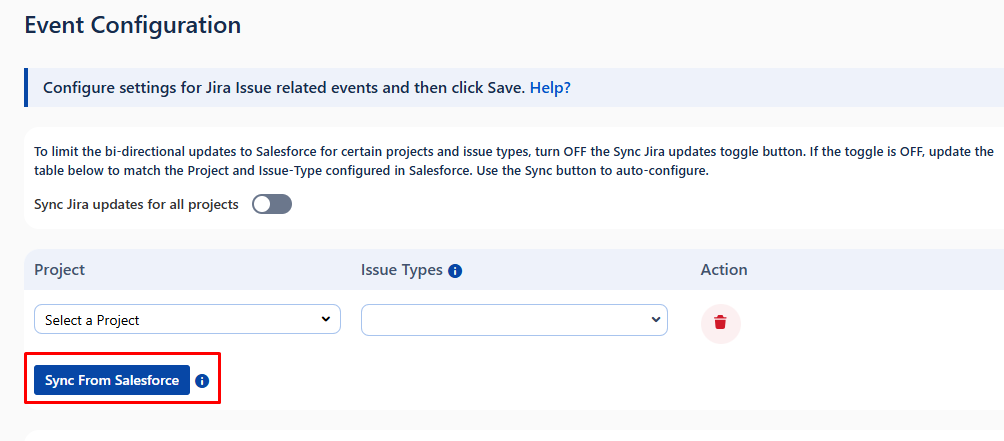
Click the Sync from the Salesforce button to Sync the Project and issue type from the Salesforce. The i icon denotes the Projects are not in Sync with Salesforce.
The list of projects and issue types that are mapped in Salesforce will appear automatically with the popup ‘Synced with Salesforce’.

Note: You can enable the Sync Jira updates for all projects toggle to synchronize Jira updates for all configured projects and issue types.
Configuration Settings
Note: After the new Jira UI changes, if you are unable to locate the Configuration screen via the navigation menu, you can directly open it using the link below. Bookmark it for quick access:
Url: https://your-domain.atlassian.net/plugins/servlet/ac/Sinergify.Sinergify/Configuration?s=Sinergify.Sinergify__Configuration (Replace your-domain with your Jira instance domain)
Example: https://sinergify.atlassian.net/plugins/servlet/ac/Sinergify.Sinergify/Configuration?s=Sinergify.Sinergify__Configuration
/Jira Cloud Plugin(Latest version)_54.png)
Settings for panel on issue screen
Toggle this option to show or hide the Sinergify application completely from the Jira Issue Record.
/Jira Cloud Plugin(Latest version)_55.png)
Configuration
/Jira Cloud Plugin(Latest version)_56.png)
Allow Linking of Records on panel: Toggle this option to Enable or Disable the linking of Salesforce records.
Allow Unlinking of records on the panel: Toggle this option to Enable or Disable the unlinking of Salesforce records.
Show potential results: Display or hide the potential results section on the Create Case screen.
Allow Salesforce Redirect: Display or hide the Salesforce redirect Icon when viewing the Salesforce Record details.
Show Case Comments: Toggle the button to Enable or Disable the Case Comments Tab for Jira Users.
Post Case Comments: Toggle the button to Enable or Disable the posting of new Case Comments for Jira Users and keep it to view only.
Show Feed Posts: Toggle the button to Enable or Disable the Feed Tab in Jira Records.
Create feed Posts: Toggle the button to Enable or Disable the creation of new Feed Posts and keep it Read-only.
Allow Bulk Creation of Cases: Enable this toggle to allow bulk creation of cases from Jira. This is an add-on feature on the Jira side. Please reach out to the Sinergify Support team for more details and configuration assistance.
Default Value Checkbox (Global Behaviour):
Enable this toggle to allow end users to select or
modify values in the bulk creation table when creating cases.
-
Editable: Enable this toggle to allow end users to select or modify values in the bulk creation table when creating cases.
-
Non-Editable: Enable this toggle to allow end user to decide weather the default value will be used while creating the case or not.
Show Email messages: Enable the toggle to see the email messages on the view detail page.
Show Inline Images: Enable the toggle to see the Inline images on the record detail page.
Map Jira Projects and Issue Types
Limit the API callouts to Salesforce while getting the Linked SF objects detail at Sinergify Webpanels (List/Compact view) on the Jira issue detail screen. If toggle is OFF, API callouts will be sent only on the below configured Project and Issue Types. Use the Sync button to auto-configure the same as configured in Salesforce.
/Jira Cloud Plugin(Latest version)_57.png)
Field Configuration
Already Mapped Objects: This will show you the Objects that have been mapped on the Salesforce side Administration Panel. If the object is removed from Sinergify admin settings then the Object will be shown in Red. See the reference screenshot.
/Jira Cloud Plugin(Latest version)_58.png)
Note: If you do not see any Object, kindly complete the Project Mapping & Field Configuration on Salesforce.
Choose a Salesforce Object:
Select the Salesforce object to configure fields. Once an object is selected, the Configure Fields section appears automatically. Objects in the dropdown are based on the Salesforce Sinergify Admin settings.
/Jira Cloud Plugin(Latest version)_59.png)
Configure Fields:
After selecting the object, the field configuration screen appears with four tabs: Search, Details, List, and Compact.
Search: Search results will be pulled in Jira using the fields selected below. You can select up to a max of 5 fields. Search your Salesforce fields under Available Fields and then select the Checkbox.
/Jira Cloud Plugin(Latest version)_60.png)
Details: Salesforce object fields selected in this section will be used to show salesforce record details on the Jira issue page. Search your Salesforce fields under ‘Available Fields’ and then select the Checkbox. The order of the fields will be displayed on the Jira page as per the selection.
/Jira Cloud Plugin(Latest version)_61.png)
List : The list tab will contain only those fields whose maximum character length is less than 256 characters and the selected field will be displayed on the list view panel on the Jira issue Page. For. E.g. For Objects like Case, Case Number will be auto-selected. See the reference screenshot below.
/Jira Cloud Plugin(Latest version)_62.png)
Compact: The Compact View will only display those fields whose maximum character length is less than 256 characters and at most 5 fields can be displayed in that view. Standard fields like Case Number (When Case Object is mapped) will be Pre-selected and displayed by default.
/Jira Cloud Plugin(Latest version)_63.png)
Salesforce Settings
Note: After the new Jira UI changes, if you are unable to locate the Salesforce Settings screen via the navigation menu, you can directly open it using the link below. Bookmark it for quick access:
Url: https://your-domain.atlassian.net/plugins/servlet/ac/Sinergify.Sinergify/sObjectSettings?s=Sinergify. Sinergify__sObjectSettings (Replace your-domain with your Jira instance domain)
Example:https://sinergify.atlassian.net/plugins/servlet/ac/Sinergify.Sinergify/sObjectSettings?s=Sinergify. Sinergify__sObjectSettings
It is used to map Salesforce Object fields with Jira project fields to prepopulate the field values on the Create Salesforce Record Screen. See the reference screenshot below:
/Jira Cloud Plugin(Latest version).jpg)
Salesforce Assignment Rules : Set the default value to run assignment rules for Lead and Case objects when creating Salesforce Records.
/Jira Cloud Plugin(Latest version)_64.png)
Choose a Salesforce Object: Choose the Salesforce object from available options. This will show objects that are mapped in both the Salesforce Admin setting and the Jira Configuration screen.
Note: In case there are no objects visible here that have been mapped in Salesforce, you should navigate to the Configuration Screen and map the object.
/Jira Cloud Plugin(Latest version)_65.png)
Choose a Jira Projects: Choose a Salesforce object from the available list, the dropdown shows the projects Mapped in Both the Salesforce Admin setting and the Jira Configuration screen.
/Jira Cloud Plugin(Latest version)_66.png)
Note: In case there are no projects visible here that have been mapped in Salesforce, you should navigate to the Salesforce Project Configuration Screen and map the Project.
Based on the selected Jira project, the required field will appear.
/Jira Cloud Plugin(Latest version)_1.jpg)
You can edit the labels of the Jira fields. Only the names used in the labels for Jira fields will appear on the Record Creation page on the Jira side.
/Jira Cloud Plugin(Latest version)_2.jpg)
You can also decide the mapping of picklist values which is applicable only for picklist-type fields. To do this, click on the icon as shown in the screenshot below.
/Jira Cloud Plugin(Latest version)_67.png)
Once you decide the values click on the ‘Map’.
/Jira Cloud Plugin(Latest version)_68.png)
Click on the gear icon, to unlock further settings for respective fields.
/Jira Cloud Plugin(Latest version)_69.png)
Using Field settings
-
Default Values: This feature allows users to set a default value for the Salesforce record field which is mapped in the Salesforce setting screen. It helps to see the default value in the desired field while creating a Salesforce record from Jira, eliminating extra effort for filling in a value.
For example: We have set the default value for the Assignee. This is how it will look while creating a Salesforce record.
/Jira Cloud Plugin(Latest version)_70_thumb_0_0.png)
/Jira Cloud Plugin(Latest version)_70.png)
-
Columns: You can choose to display the fields in either a 1-column or 2-column layout.
For example: We have given the column 2 for Summary and 1 for Description:
/Jira Cloud Plugin(Latest version)_71.png)
/Jira Cloud Plugin(Latest version)_72.png)
This is how it will appear on the Create Salesforce Record screen:
/Jira Cloud Plugin(Latest version)_73.png)
-
Help text: Type in a small description for the respective field to help end users better understand what this field is about.
For example: We have given the Help-text for the field Internal comment.
/Jira Cloud Plugin(Latest version)_74_thumb_0_0.png)
This is how it will look like on the Create Salesforce record screen.
/Jira Cloud Plugin(Latest version)_75_thumb_0_0.png)
/Jira Cloud Plugin(Latest version)_76_thumb_0_0.png)
-
Use for Potential Results: The potential results feature searches for existing Salesforce record tickets in real-time and helps to prevent duplication and saves time. Admin can Enable/Disable the ‘Potential Results’ from the Configuration tab.
For example: We have selected the summary to represent the potential Results.
/Jira Cloud Plugin(Latest version)_77_thumb_0_0.png)
This is how it will look like on the Create Salesforce record screen.
/Jira Cloud Plugin(Latest version)_78_thumb_0_0.png)
-
Read only: Fields for which read-only is enabled cannot be edited on the Jira side. Users can only view these fields.
-
Field order: You can set the order of the fields to display on the Create Salesforce record screen from this option.
/Jira Cloud Plugin(Latest version)_74.png)
/Jira Cloud Plugin(Latest version)_75.png)
/Jira Cloud Plugin(Latest version)_76.png)
/Jira Cloud Plugin(Latest version)_77.png)
/Jira Cloud Plugin(Latest version)_78.png)
Restrict Issue Types
/Jira Cloud Plugin(Latest version)_79.png)
The Restrict Issue Types setting allows users to define which Jira issue types should be restricted on Salesforce records creation, linking, and unlinking. This ensures that only relevant Jira issues are considered, preventing unnecessary or unwanted records and associations in Salesforce.
Plugin Uninstallation
Please follow the steps below in case Plugin needs to be uninstalled from the Jira Instance.
-
Click on the Apps tab, and under the drop-down menu, click Manage your apps.
-
Click on the Uninstall option under the Sinergify app.
/Jira Cloud Plugin(Latest version)_80.png)
-
Select Uninstall and the application will be uninstalled.
/Jira Cloud Plugin(Latest version)_81_thumb_0_0.png)
/Jira Cloud Plugin(Latest version)_81.png)


