Feedback
Salesforce Details on Jira
Published Date: 17-03-2026
Read Time:
It is not feasible to sync every bit of information from Salesforce to Jira. So we made it possible for Jira users to access Salesforce Object details without logging into Salesforce.
This is a one-time setup that needs to be done from Salesforce. Once configured and enabled , Jira users can view the details about the Salesforce records linked to Jira.
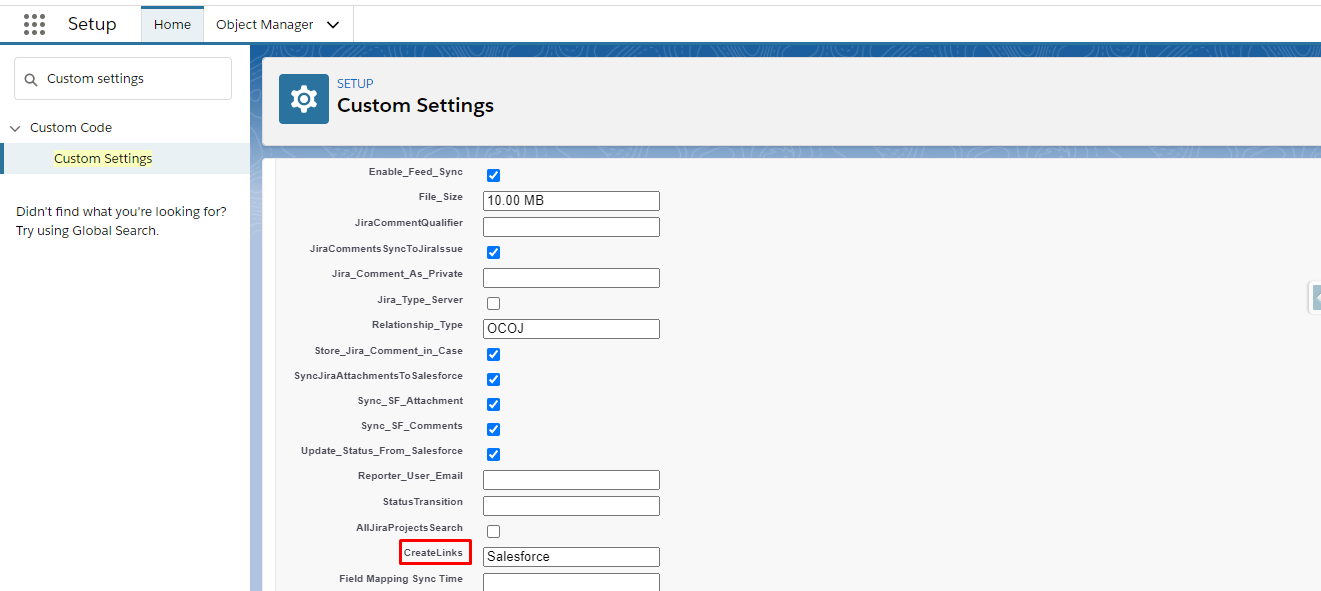
Records like Salesforce Domain, Create links, and Timestamps should exist in your Salesforce Org to enable the Salesforce Details page. Setting up these records is categorized under Custom Settings in Salesforce.
Besides that, a dedicated Jira field should be there to storing the links in the Salesforce Org (This field can vary for each project).
Setting up the Custom settings
Step 1: From ‘Setup’, enter ‘custom settings’ in the ‘Quick Find’ box and click on it from search results. Then click ‘JiraSalesforcedetail’.
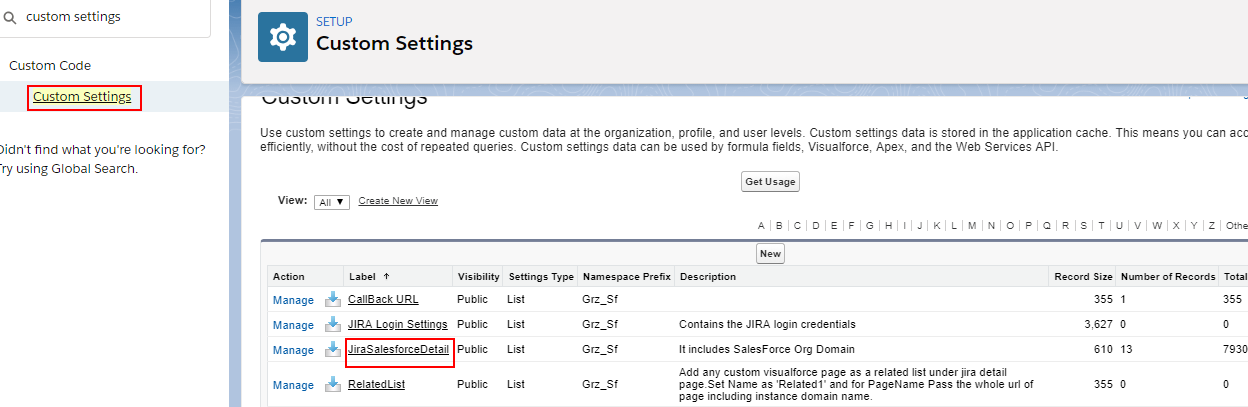
Step 2: Click ‘Manage’.

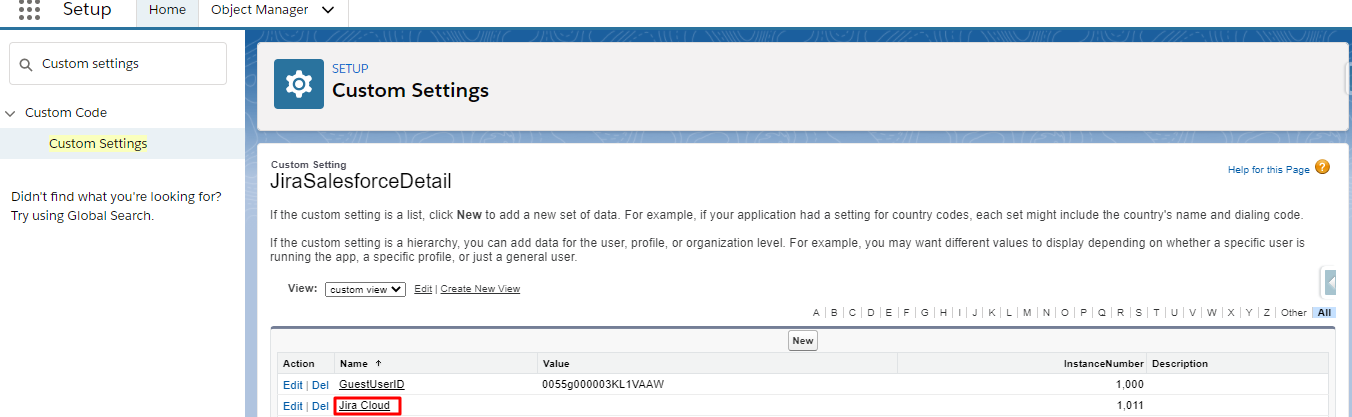
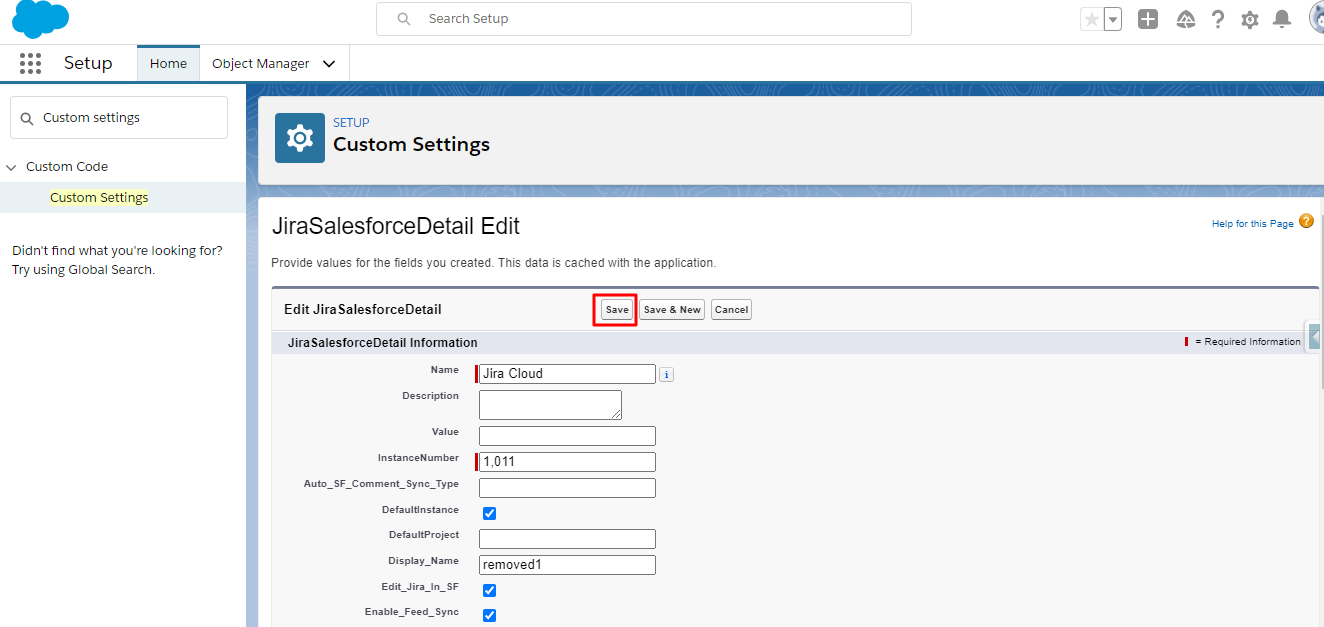
Step 3: You will see all the Jira instances that you have added in your Salesforce Org. Edit the Jira instance for which you want to configure the settings. For example in the below screenshot, we will be configuring changes for Jira Cloud.
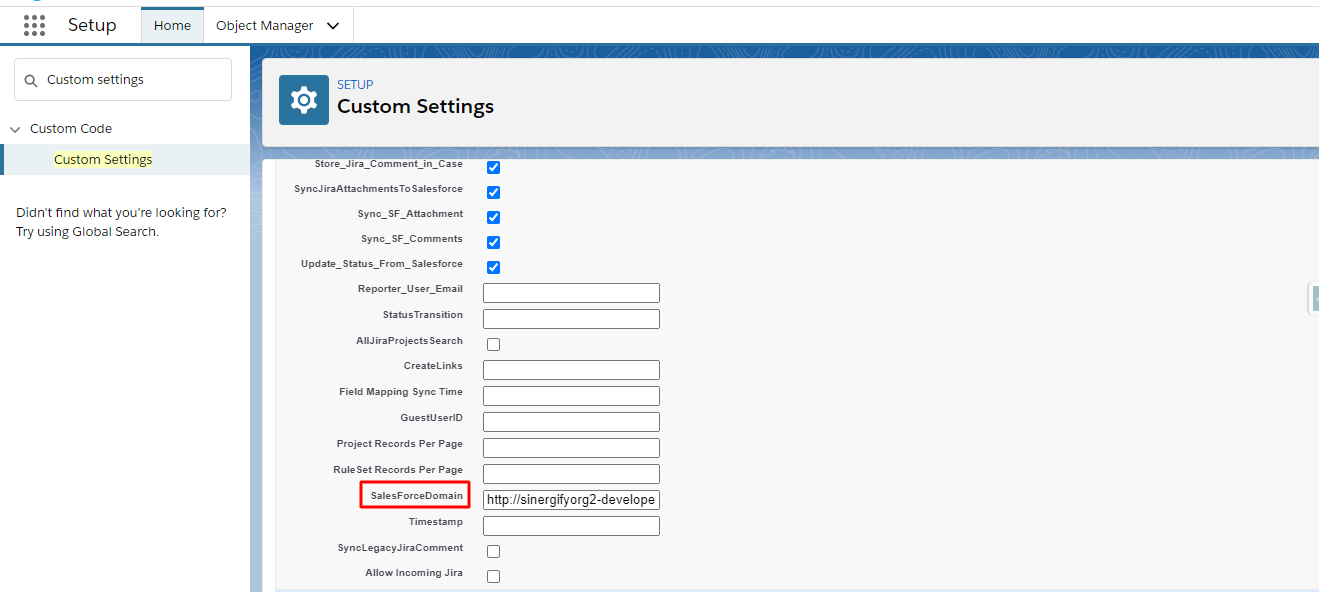
Step 4: On the JiraSalesforcedetail Edit page, enter values in the following fields:
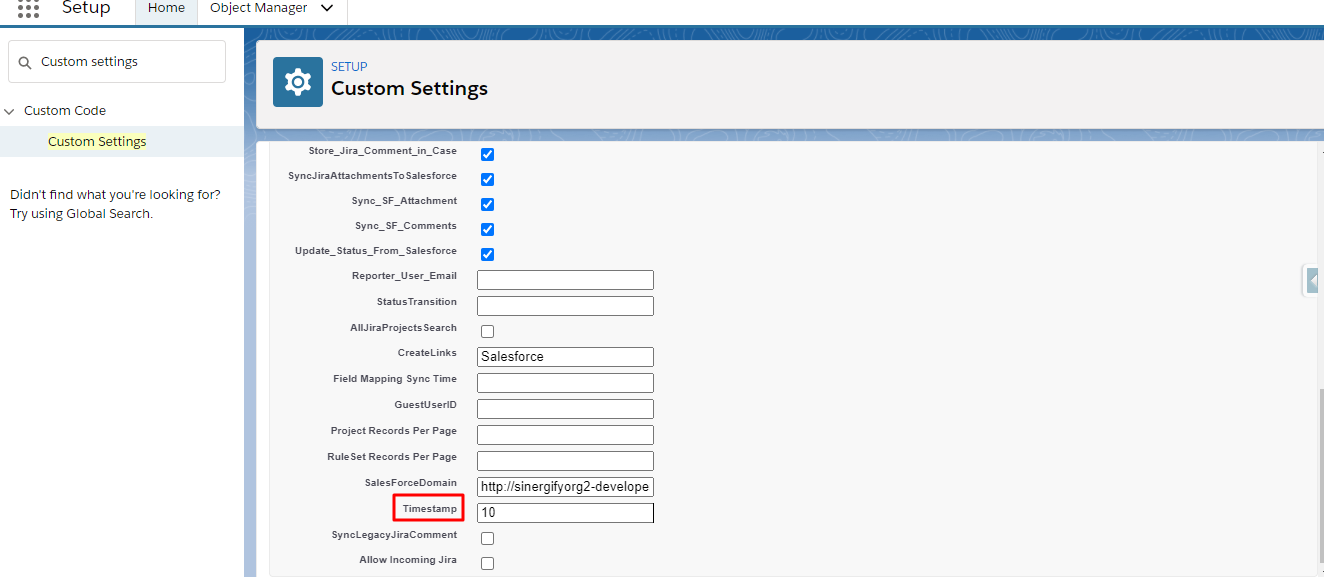
- In SalesforceDomain: Insert Site User URL.
- In the createLinks field: Enter either Salesforce or Encrypted.
- ‘Salesforce’ to create links that direct back to the Salesforce Detail page/record.
- ‘Encrypted’ to create links that direct to the custom detail page.


Step 5: In the Timestamp field: Add the time duration (in minutes) for which the link will remain active in the Jira instance. If the link is not accessed within the set time limit, it gets expired and a new link gets generated automatically while clicking on the View Jira link on the object-related list. The Timestamp is required if you are using encrypted links.
Step 6: Once done, click Save.
Dedicating Jira Field
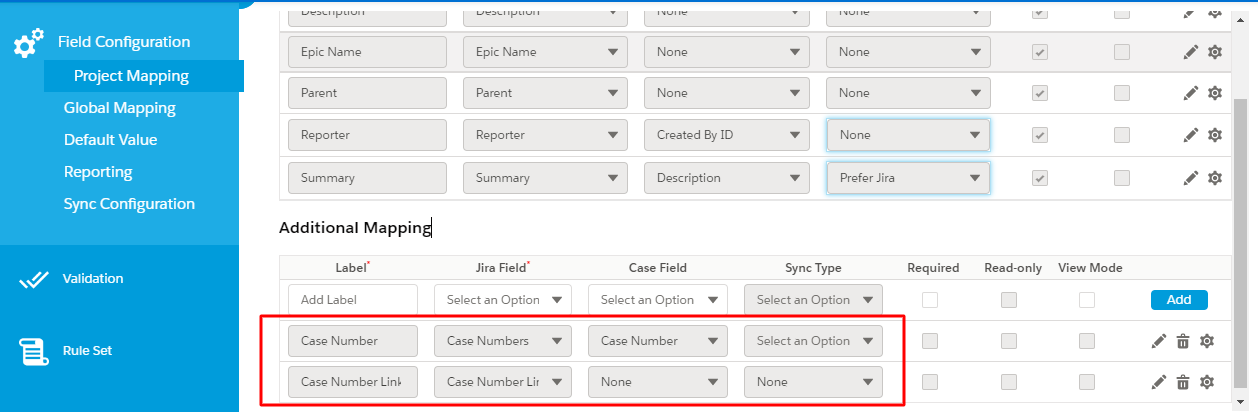
You need to dedicate two Jira fields; one for storing case numbers and the other for case number links.
The data type for the case number field should be label and for case number links it should be text area multiline.
Refer to the screenshot below:
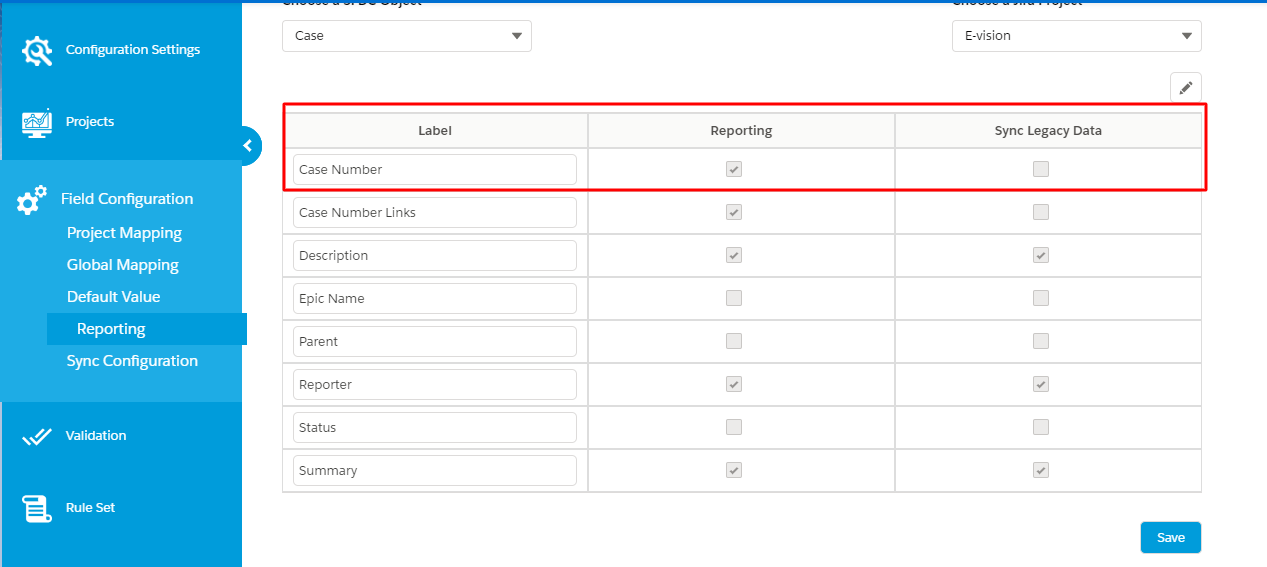
Enabling the reporting for a field (storing case number)
It is mandatory to enable the reporting for the field, which you have dedicated to storing the case numbers.
You can enable reporting by navigating to the reporting section of the Field configuration tab. Refer to the screenshot below.
Showcasing only the Case Number Field on the Jira Page
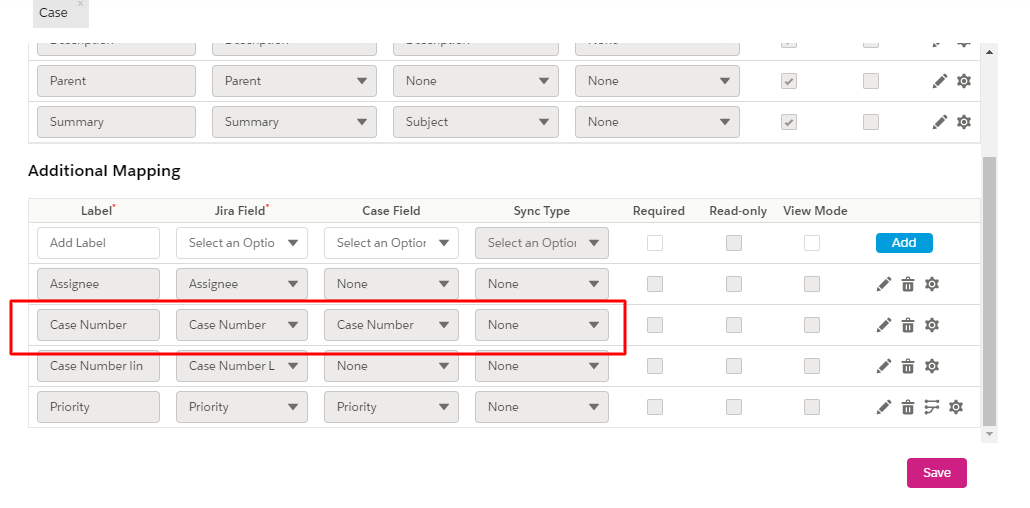
You firstly need to map the Salesforce and Jira fields from the Admin Settings to make case numbers visible on the Jira page. In the below screenshot ‘Case Number’ Jira field is mapped with the ‘Case Number’ Salesforce field.
You have the choice to showcase the case number, case number links, or both on the Jira page.
To make only the case numbers visible on the Jira instance, follow the given steps:
Step 1: From Admin Settings on your Sinergify app, go to the Field Configuration -> Project Mapping. Click on the settings of the Case Number field.
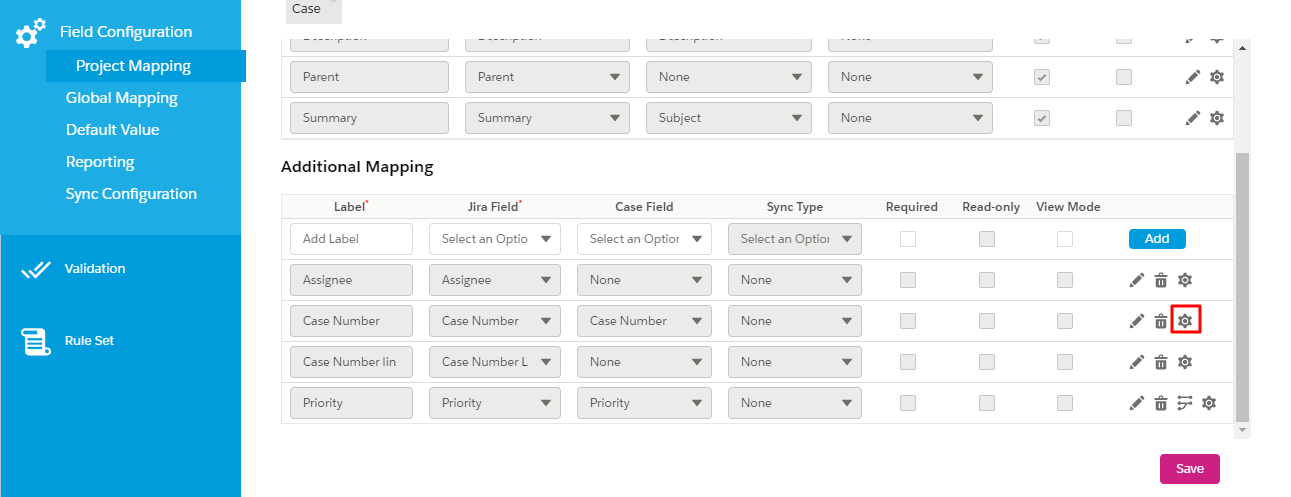
Step 2: A pop-up screen will appear on your screen. Navigate to the option EnableNamelinking and click on the checkbox.

Step 3: Click Save.
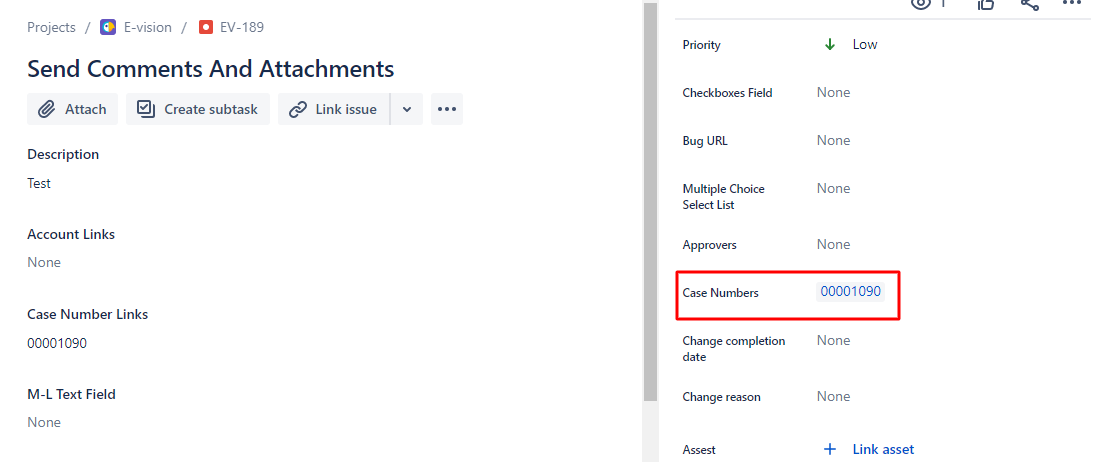
Refer to the screenshot below to view how the fields will look on the Jira page.
Showcasing ‘CaseLinks’ on the Jira Page
Additionally, if you want to showcase the case links on the Jira page, follow the given steps:
Step 1: From Admin Settings of your Sinergidy App, go to the Field Configuration -> Project Mapping. Click on the settings of the Case number link field.
Step 2: A pop-up screen will appear on your screen. Navigate to ‘Enable Record Mapping’, and click on the checkbox.
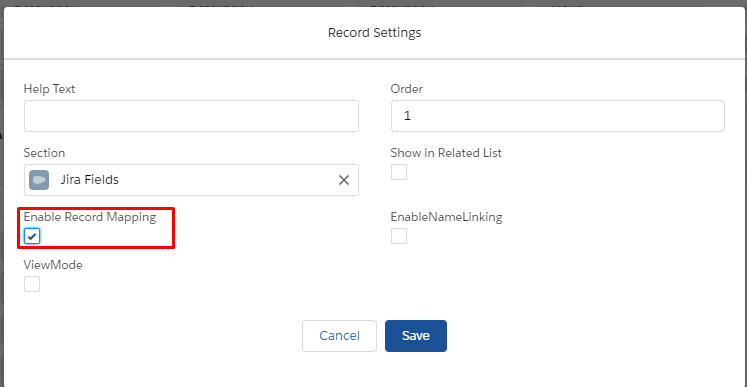
Step 3: Click Save.
Refer to the screenshot below to know how the fields will appear on the Jira page.

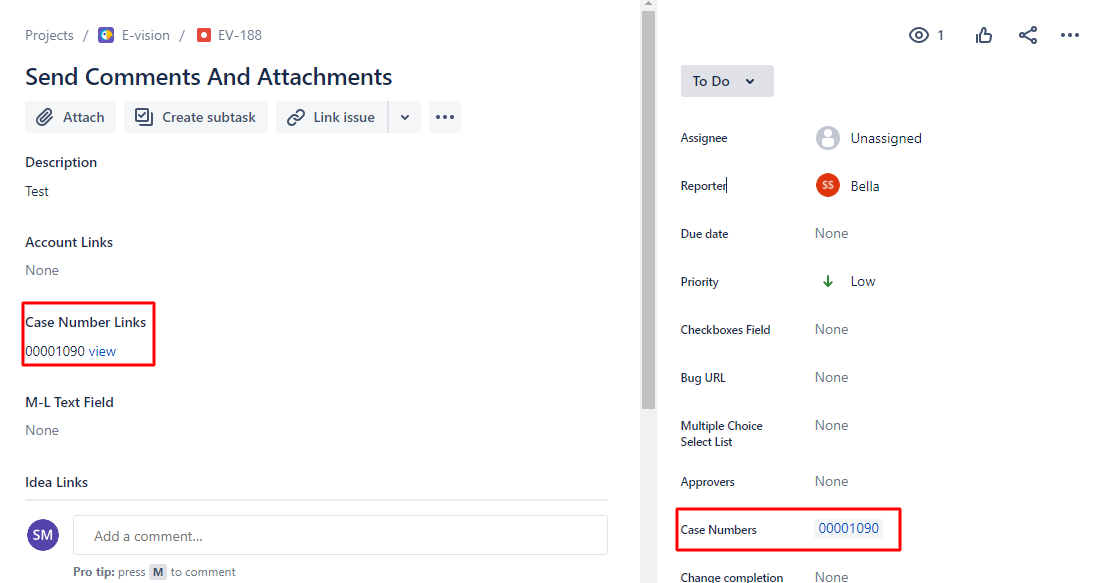
Showcasing both ‘Case Number’ and ‘Case Number links’ fields on Jira
If you want to enable both the options, follow the above-mentioned steps for both the fields i.e. Showcase case links and Showcase case numbers. Refer to the screenshot below, how the fields will appear on the Jira page.
Create records in ‘Detail Page Fields’ Custom Setting for Salesforce Detail Page
This custom setting is used to decide the fields that should be visible on the Jira detail page. For example, If you want to see some case fields like CaseNumber, Subject, and Description on Jira then those fields should be added as a record under this custom setting.
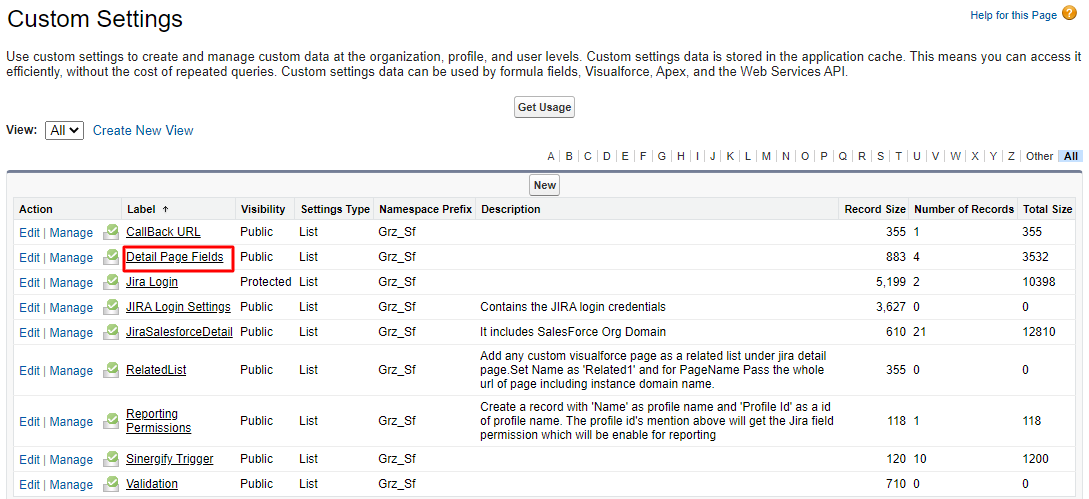
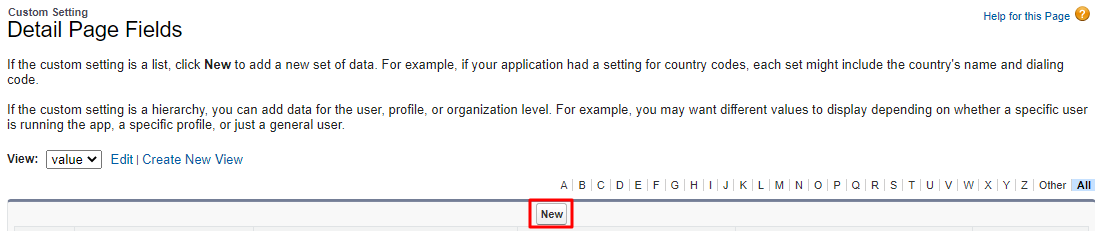
Step 1: From the Setup page, Enter ‘Custom Settings’ in the Quick Find box and click on it from the results.
Step 2: Navigate to ‘Detail Page fields’ and click on it.
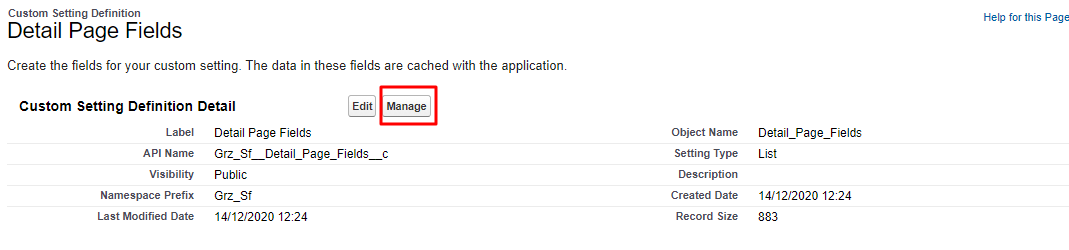
Step 3: Click ‘Manage’.
Step 4: Create a new record by clicking on the ‘New’ button.
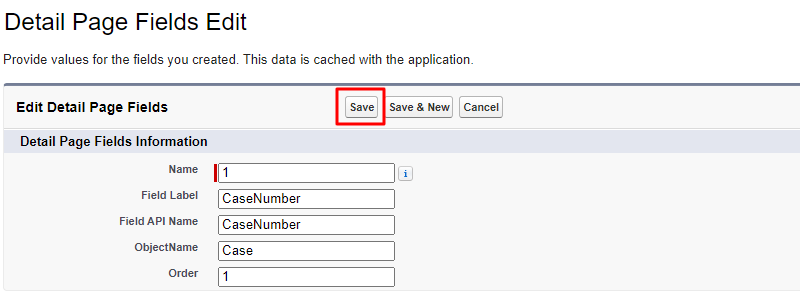
Step 5: Fill in the details like :
- Name: Give a serial number to the field
- Field Label: Give a unique label to the field. Like in the screenshot below we have added CaseNumber
- Field API Name: Enter the API name of the field
- ObjectName: Enter the object name to which the field belongs
- Order: You can define the order of the fields. Like in the screenshot below, in the order field we have added ‘1’, which means CaseNumber will be the first field on the detail page.
Step 6: Save the changes.
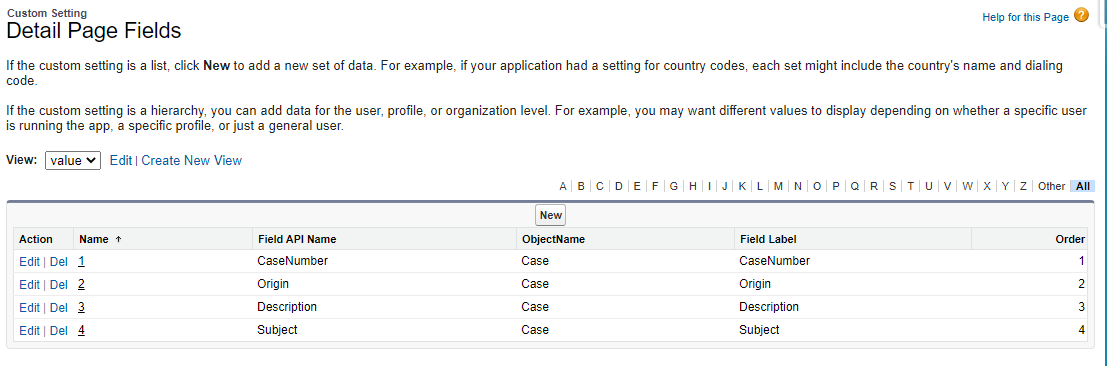
Step 7: All the fields defined for the Jira detail page can be viewed on the ‘Detail Page Fields’ custom setting page. Refer to the screenshot below.
Viewing the Salesforce details (Via Encrypted Link Setting)
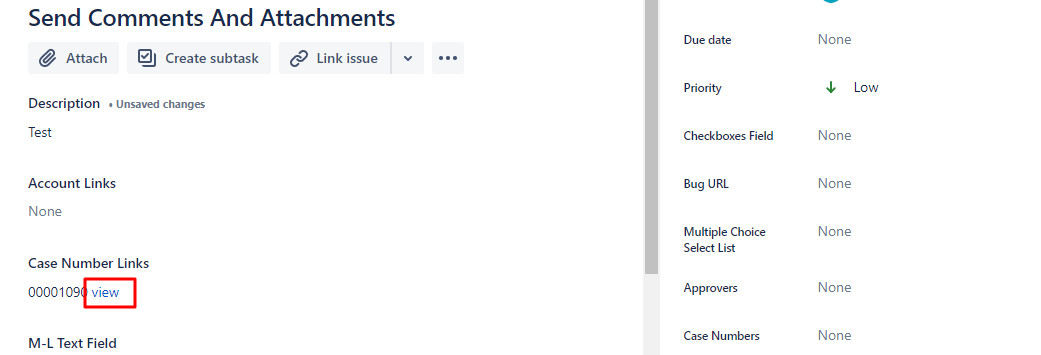
Step 1: On the Jira instance, click ‘View’ next to the field (for which Salesforce mapping is enabled). The view link will remain active only for the time as defined in the timestamp record. Users will be sent a warning message when the link gets expired. The link gets renewed automatically.

Step 2: Case detail screen appears consisting of the fields defined.

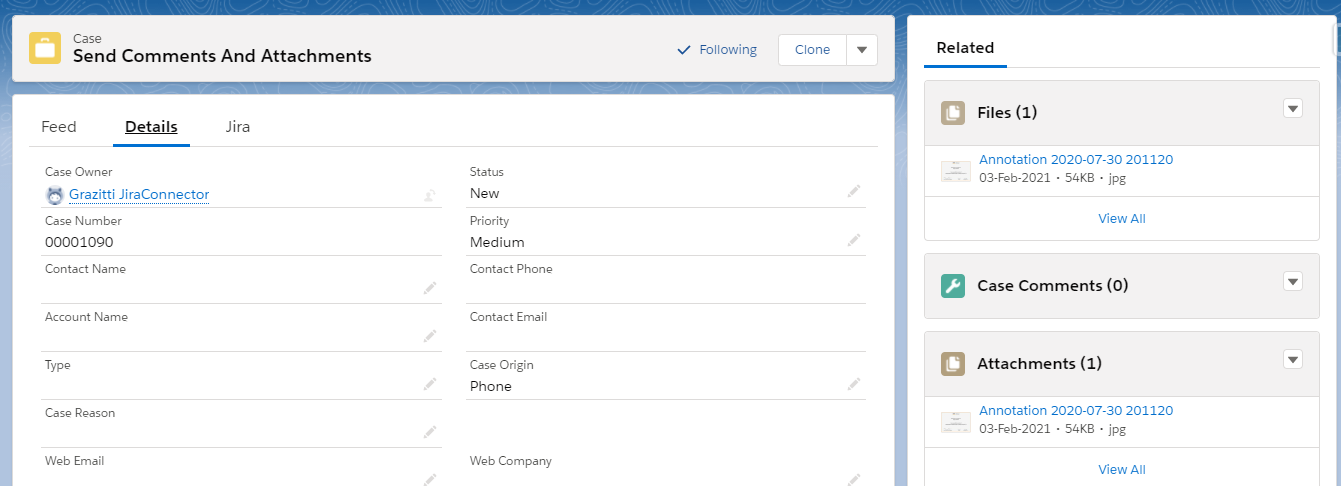
Viewing the Salesforce Record details (Via Salesforce link setting)
In case the admin has configured the value of ‘Create Link’ custom setting to ‘Salesforce’, then on clicking the view link the user will be directed to the Salesforce detail page.

Refer to the screenshot below to view the Salesforce Detail page.