
 Feedback
Webhook and Site
Published Date: 05-08-2024
Read Time:
Setting up Site
Step 1: Create a Site (when there is no pre-existing domain.)
Enter the Site name and click ‘Check Availability’. If available click ‘Register My Salesforce Site Domain’.

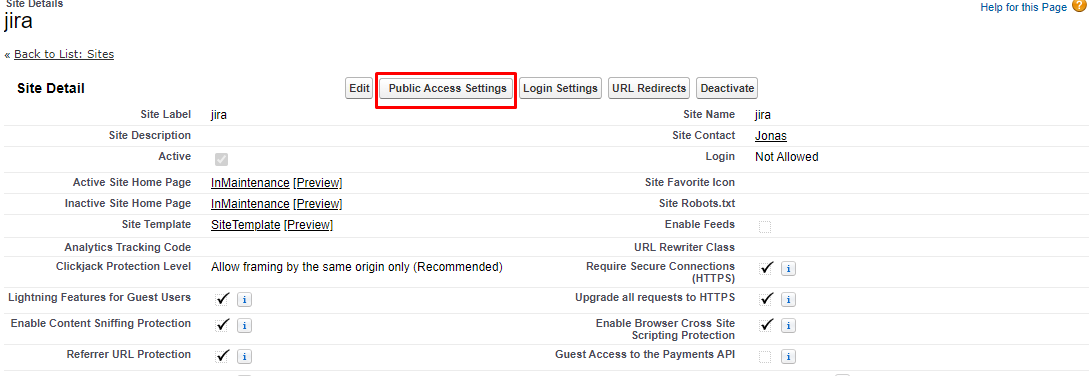
Step 2: Click on the existing or newly-created ‘Site’.

Step 3: On top of the ‘Site Detail’ page, click ‘Public Access Settings’.
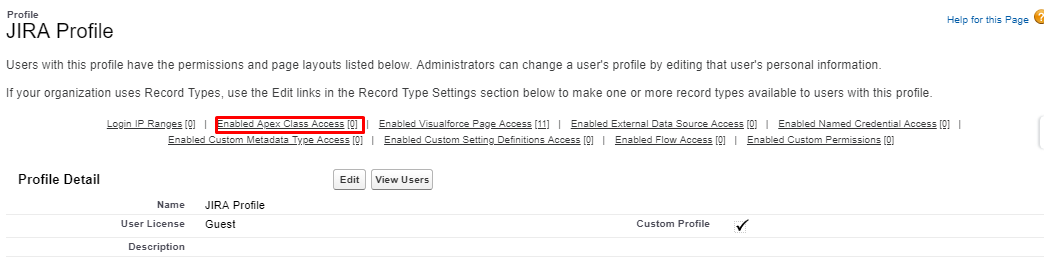
Step 4: On the top of the ‘Profile’ page, click ‘Enabled Apex Class Access’ button.
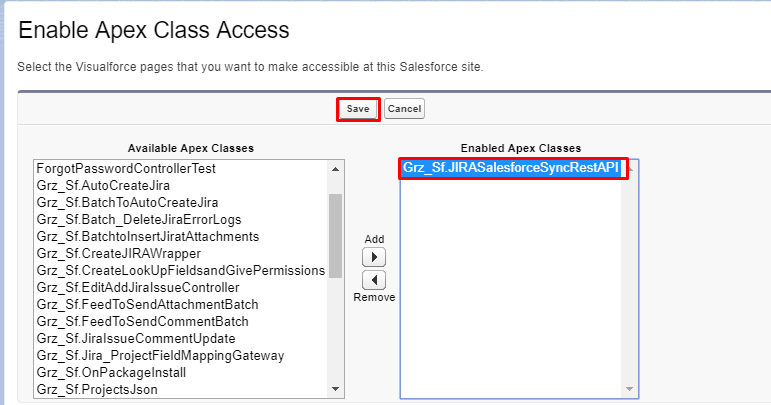
Step 5: Click ‘Edit’.

Step 6: Select “Grz_Sf.JIRASalesforceSyncRestAPI” class from Available Apex Classes’ and add it to ‘Enabled Apex Classes’ and click ‘Save’.
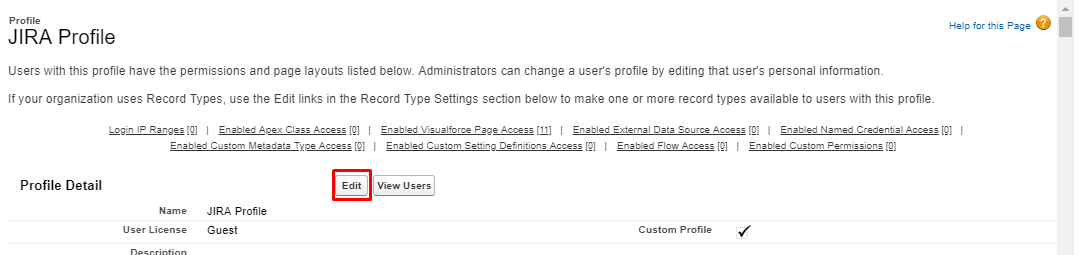
Step 7: Again, click ‘Public Access Settings’.
Step 8: Click ‘Edit’
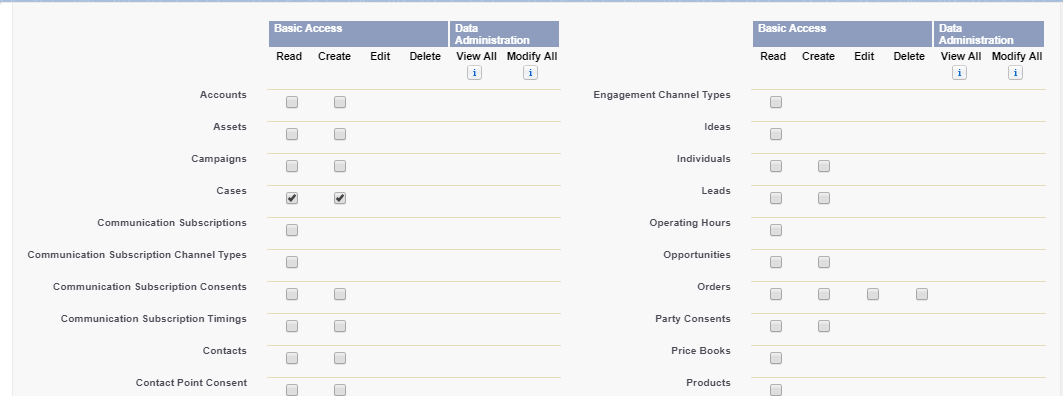
Step 9: Scroll down on the ‘Standard Object Permissions’ page and select the ‘Read’ permission for object(s) linked to Jira. For example, here permissions are assigned to the ‘Cases’ object as it is the only object linked to Jira.
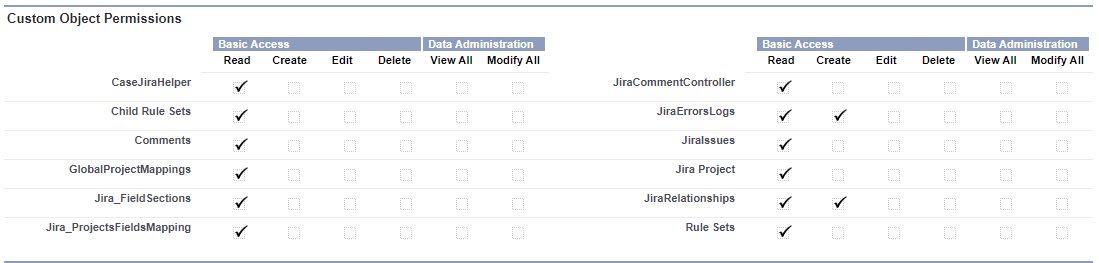
Step 10: Similarly, Scroll Down on the ‘Custom Object Permissions’ page and select permissions( as shown in screenshot below) to all the objects. The following objects are a part of the package and providing permission is mandatory for these objects:
- Casejirahelper
- Child Rule Set
- Comments
- Jira_Field Sections
- JiraProjectsFieldMapping
- Jira Comment Controller
- JiraErrorlogs
- JiraIssues
- JiraProjects
- Jirarelationships
- Rulesets
Step 11: Save the settings.
Step 12: Go to the Setup, in the ‘Quick find box‘ type Custom settings.
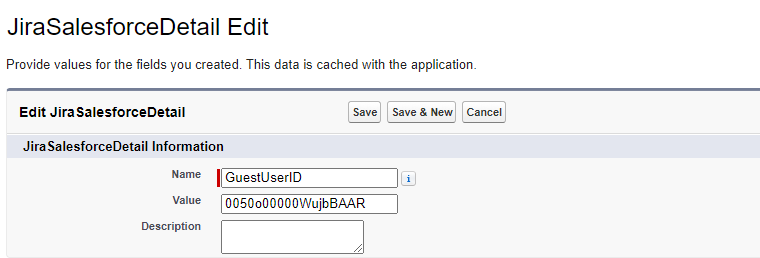
Step 13: Look for ‘JiraSalesforceDetail’ Custom setting.
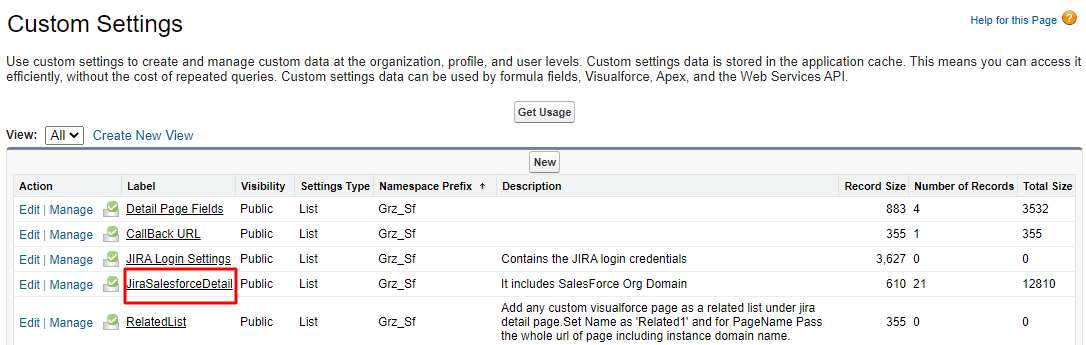
Step 14 : Click on the ‘Manage’ button.
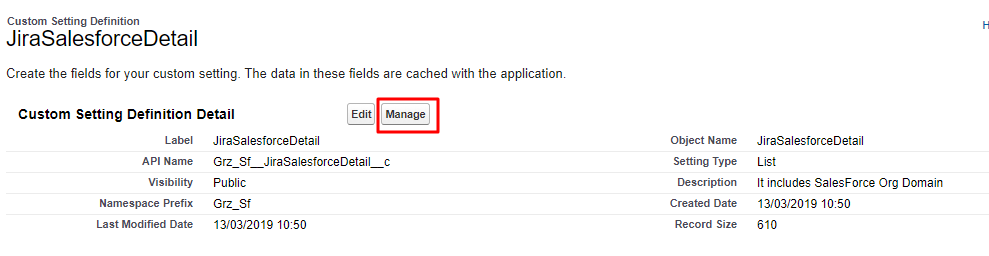
Step 15: Create a new record, with name GuestUserID. Add the user ID in the value field. Save the record.
SELECT id,username From User WHERE username='Put Your Site Username Here’
Step 16: Under the ‘Field-level Security’ section on the ‘Profile Detail Page’, click ‘View’ next to the objects (custom/standard) linked to Jira.
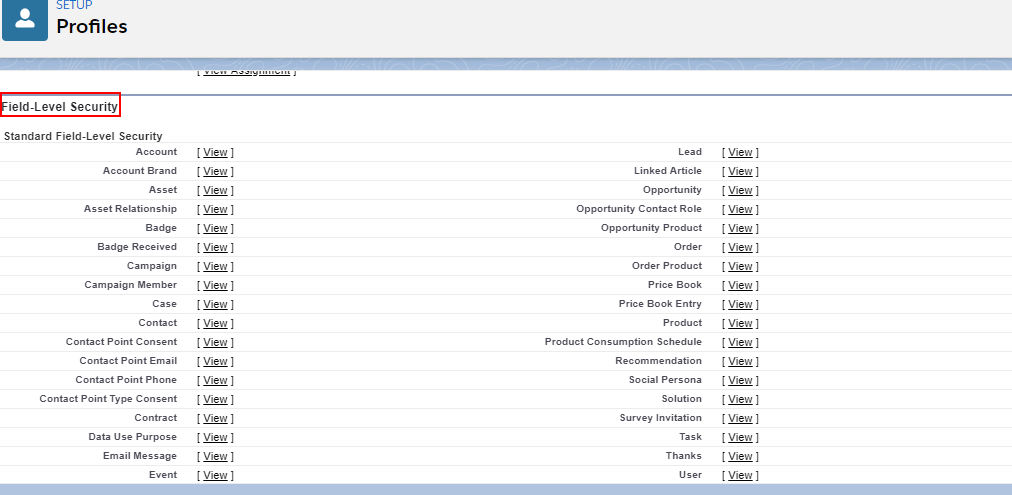
Step 17: Select ‘Read Access’ and ‘Edit Access’ to fields of all objects (Standard and Custom) linked with Jira. Share field-level access to all the following custom objects related to Jira:
- CaseJirahelper
- Child Rule Set
- Comments
- Jira_Field Sections
- JiraProjectFieldMapping
- Jira Comment Controller
- JiraErrorlogs
- JiraIssues
- JiraProjects
- Jirarelationships
- Rulesets
For example, in the below screenshot field-level permissions are shared for ‘JiraIssue’ custom object.

Step 18: Click ‘Save’.
Setting up the WebHook
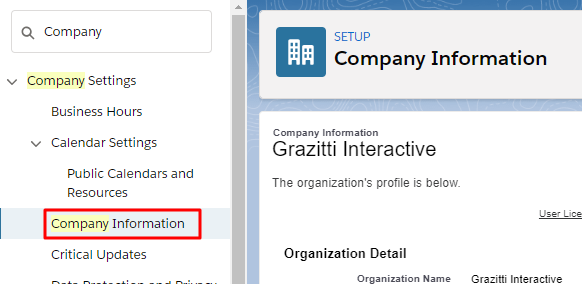
Step 1: Go to 'Setup’ and search ‘company’ in the ‘Quick Find’ box. Click ‘company Information’ as specified in the screenshot below.
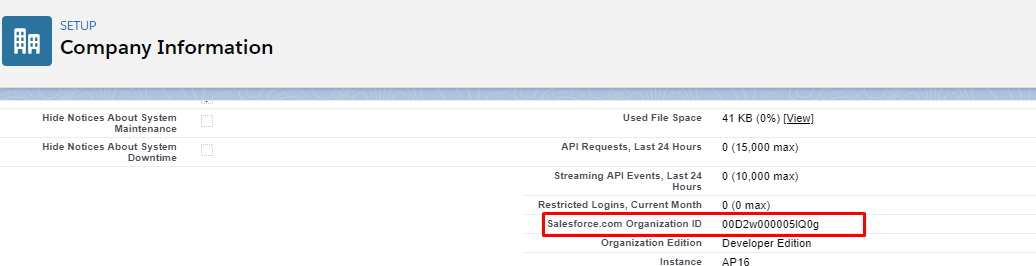
Step 2: Copy the ‘Salesforce.com Organization ID’ from the ‘Company Information’ page.
Step 3: Now combine your ‘Site URL’ and ‘Organization ID’ with
‘services/apexrest/Grz_Sf/webhook/JIRA?commentId=${comment.id}&jiraId=${issue.id}&orgId=’
Final URL should be in the following format: siteurl+’services/apexrest/Grz_Sf/webhook/JIRA?commentId=${comment.id}&jiraId=${issue.id}&orgId=’+Orgid
Step 4: Copy the Final URL. It will be required for further process. The final URL should look like the URL below:
https://bigthree-developer-edi-developer-edition.ap16.force.com/jira/services/apexrest/Grz_Sf/webhook/JIRA?commentId=${comment.id}&jiraId=${issue.id}&orgId=00D2w000002AY28
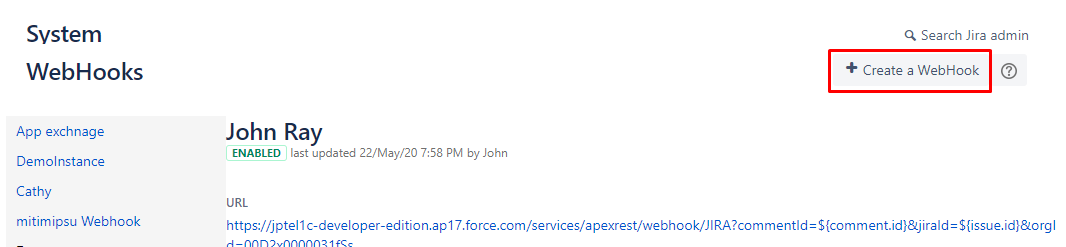
Step 5: Now Log into your Jira instance. Go to System Setting and then ’Webhooks’. Click ‘Create a Webhook’.
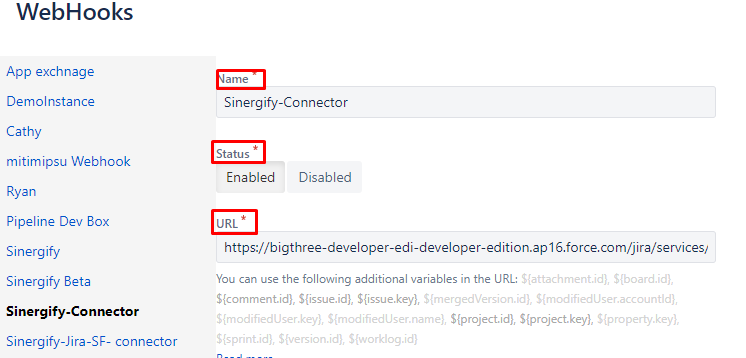
Step 6: Fill in the fields like Name, URL(final URL as created in Step 4) and select the ‘Status’ to ‘Enabled ‘.
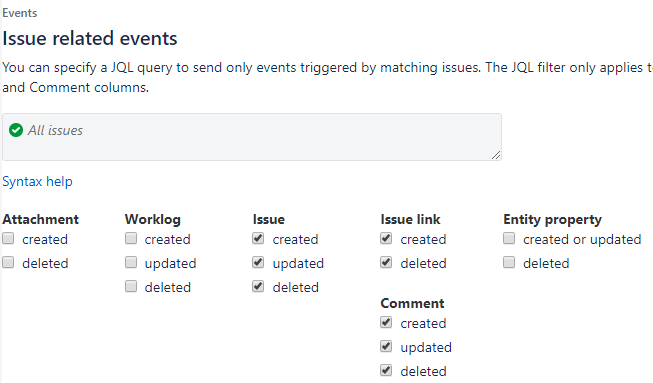
Step 7: Enable the following permissions in the ‘Events’ section.
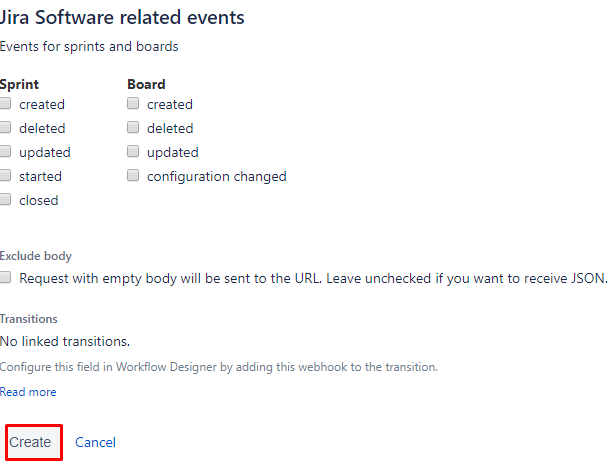
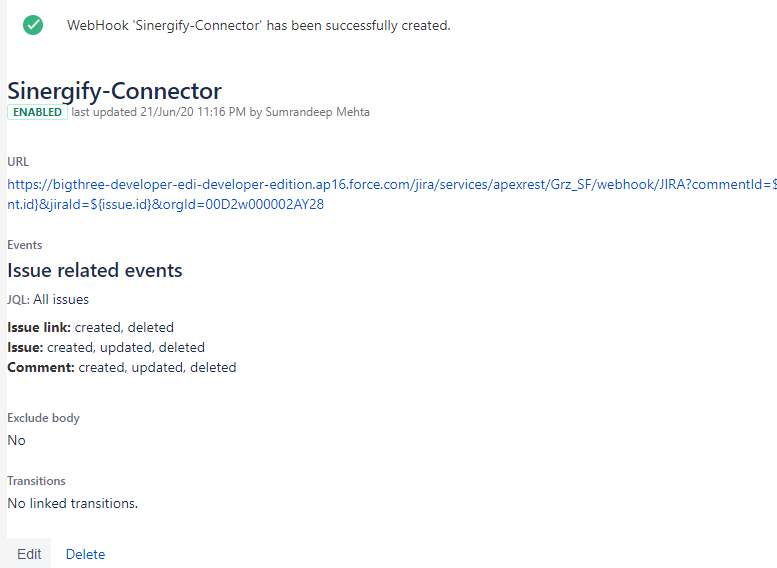
Step 8: Click ‘Create’ at the bottom of the page and the new Webhook will be created. The final view of the page will look as below.
After completing the installation, users can navigate to installed ‘Sinergify’ application and complete the configuration process.


